Alyssa Archer-Cooper
Art Education major
Kids Create Claymation Characters in Action! A Guide for Art Educators in the Community Art Setting
Lesson Plan
UNIT PLAN
UNIT TITLE: KIDS CREATE CLAYMATION CHARACTERS IN ACTION!
Art Educator: Alyssa Archer-Cooper
Location: Community Art Education Settings
Population: Who: children who are part of a community group program with varying degrees of artistic skills. Age: The activities are designed for children aged 9 to 12 Number of sessions for this unit plan: 3 sessions total The unit plan comprises of a total of 3 sessions, with 1 hour and 30 minutes of time dedicated to each session, for a total of 4 hours and 30 minutes for all 3 sessions combined.
MEQ Competencies: Competency #2: Creates media images. Competency #3: Appreciates works of art.
Rationale: This unit plan is specifically geared towards young participants in art programs/art initiatives within the community. Participants may differ in age and maturity levels, and may have varying degrees of artistic skills, based on their exposure to art in school, at home, and/or at a community center. The community setting should act as a safe space where participants can create a sense of bonding with the community through various art activities. The artworks produced should give the participants a sense of pride, joy, ownership, and accomplishment. Whether these participants are coming from low-income homes where poverty is prevalent, or from families with a high socio-economic status, the community setting is meant to make everyone feel welcome, and create a sense of belonging. Furthermore, these participants are at the ages where their levels of creativity and imagination are at an all-time high. Being able to assist a mentor and facilitate art courses in a previous semester in a community art studio with participants around the same age has allowed me to see this in-depth, based on the progression of the art pieces. These are all valuable sources of information that I kept in mind when developing my unit plan. Essentially, I chose this unit because I wanted to give the participants an outlet to express their creative thoughts on paper, while introducing them to new and exciting concepts, techniques, and digital media that they may not have been exposed to before.
Unit Plan Focus: The community art education theory and practice course aims to explore the influences that culture and service learning (among other factors) can have on the context of teaching within a community setting, with an emphasis on the development of both artistic and pedagogical practices that are personal and professional (Wicks, Course Outline, 2015). The lessons that make up this unit plan are structured in such a way where participants have an opportunity to create their own clay animation characters, crafted from initial sketches that are transformed into 3-dimensional figures that express an action. Participants are introduced to different art mediums and techniques in each activity, and the lessons are completed in steps (in progression) to eventually form one final digitally animated piece, which incorporates elements of the artworks from each lesson. The focus of the unit plan is to introduce a variety of art concepts, techniques, artists, and digital resources to the participants in an engaging, and unique way that will encourage them to think outside the box when creating their respective art pieces. Participants will explore the work of artists, such as Keith Haring, and Nick Park, as well as the work of the art educator, in the form of prototypes to construct 3-dimensional characters in motion, using clay. The participants will also learn media skills, such as how to capture photos using an IPhone, and how to create a digital animation with the images. These new acquired skills will manifest itself in the form of a GIF that they will develop progressively over the 3 lessons with the help of the art facilitator.
Bibliography/Resources: Taylor, R. (1996). Encyclopedia of animation techniques. London: Focal Press. Wicks, J. (2015). Personal Communication: Course Outline 2015. Community Art Education
UNIT TITLE: KIDS CREATE CLAYMATION CHARACTERS IN ACTION!
Lesson 1: The Expression of Movement
Objectives:
Learning Objectives: Participants will be introduced to the concept of claymation and will learn how to create their own characters using simple, non-harmful techniques and tools. In this lesson, participants will learn how to express movement in their art pieces using drawing tools.
Social and Community: to teach a group of children to work well together; to create an environment that is inviting and relaxing; to hold a space that is safe from physical and/or psychological harm (the space will always be clean and clear of hazardous items).
Art-Making: Participants will explore ways in which the effect of movement can be established on a flat, 2D surface, using drawing tools. Participants will make a minimum of 10 different drawings/sketches of stick figures which demonstrate the effect of movement.
Art Appreciation: Participants will learn to respond to works of art by artist, Keith Haring, as well as the works of their art educator, their peers, and reflections of their own artworks. Response activities include group discussions and reflections regarding the work of the author, one’s artwork, and that of his/her peers. Other response activities include sharing one’s with peers towards the end of the session.

Materials: Participants: Participants will not be required to bring any materials.
Facilitator: The art educator will assemble the following materials to provide to the participants: -HB pencils (for participants to make quick sketches of their stick figures in motion) -Erasers (for rough sketches) -Newsprint sheets (for rough sketches). -Brown paper and will be provided to place on the tables.
Equipment and Support Materials:
Participants: Participants will not be required to bring any equipment.
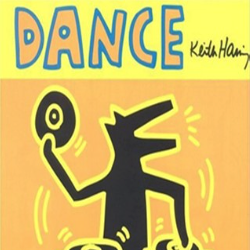
Facilitator: The art educator will bring in SLR cameras and tripods (to capture students in action, as well as a laptop and smart board. The art educator will also bring in the book entitled, “Dance”, by Keith Haring.
Motivation: (Time: approximately 10 minutes): The following will be used to motivate the art-making process: the ability to create something that has personal relevancy, an opportunity to collaborate with peers based on the way the seats are arranged (tables are placed side by side), and an exploration and discussion regarding the artwork displayed in Keith Haring’s book entitled, “Dance”. After the exploring the images from Haring’s book, the art educator will ask the participants to think about/respond to the following questions: What kinds of lines and shapes do you notice the artist using to create figures that are in motion? How is the artist using the lines and shapes to create figures that are in motion?
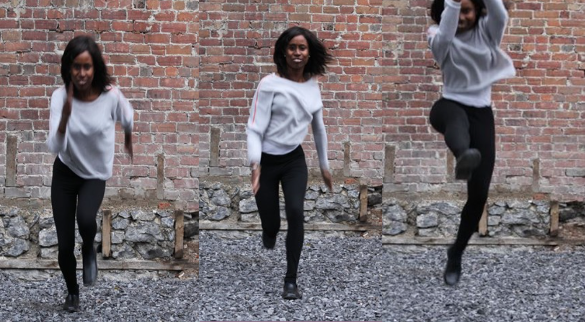
Media Exploration Activity: (Time: approximately 20 minutes): The art educator will set up some SLR cameras on tripods to capture the students in motion. The art educator will set the cameras up on the tripods in advance on auto mode with continuous shooting, and get a few students to perform a simple action such as running or jumping.
Examples of Action Shots:
Vocabulary Words of Focus and Their Definitions:
Movement/motion: Physical actions that are performed by a person
2D work of art: having its elements organized in terms of a flat surface, emphasis Source: http://dictionary.reference.com/browse/two-dimensional
SLR Camera: The term, “SLR” stands for: single lens reflex. With an SLR camera, you see exactly what the lens sees. They have large image sensors that produce high-quality photos. Overall, an SLR camera is ideal for action photography. Source: http://www.digital-slr-guide.com/what-is-a-digital-slr.html
Art-Making: Participants will work primarily from observation. The goal of this lesson is for participants to make a minimum of 10 sketches of stick figures, and it is important that these pieces showcase figures that are in the process of moving (i.e. a person who is running). Participants will have an opportunity to experiment with the SLR camera by performing simple actions that are taken with the camera and/or taking the photos themselves. They will then work individually when creating art pieces that match the characters in motion. Participants will work primarily from observation, as they will be using the pictures displayed in Keith Haring’s book as well as the action photos of themselves and/or their peers/art educator as a reference for their own art pieces. Participants will work individually, although they are encouraged to sit side by side and engage in discussion with their peers while they draw. During the art-making process, the art educator will walk around the room and tend to the participants’ needs by (i.e. answering questions, ensuring that the participants are behaving in a respectful manner, etc.).
Procedure: (Time: approximately 35-40 minutes):
1. After the media exploration activity, the art educator will ask participants to split up into groups of 2 to practice using their bodies to perform simple actions, such as running or jumping. They will take turns both in front of the camera and behind the camera. Remember that the art educator will have set the cameras up on the tripods in advance on auto mode with continuous shooting to make it easier for the participants. At this time, the art educator will walk around and help with resetting the cameras/tripods if there are any issues.
2. The art educator will use the laptop to transfer, save and display the pictures taken by the students on the smart board during the session.
3. The participants will create a minimum of 10 very basic stick figures in motion using pieces of paper, pencils and erasers. Participants are encouraged to refer to the photos taken during the session, as well as images from Keith Haring’s book, “Dance” for inspiration.
4. When participants are finished their artwork, they will circle their top 3 favorite sketches before handing their work in to the art educator.
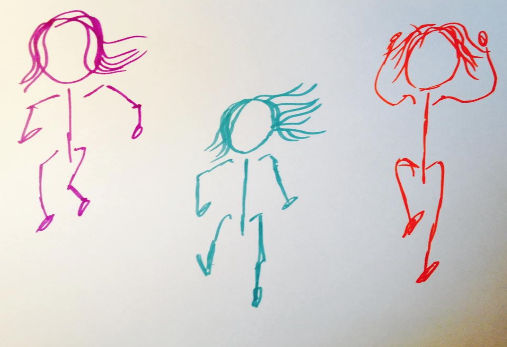
Examples of stick figure drawings in motion:
Response to Art (Incorporated in the Closure Period): When participants are finished, or close to finishing, the group will gather around in a circle to discuss the following questions as a group: Were there any images from Haring’s book that you used as an inspiration for your artwork? If so, which ones, and why? Were there any photos that were taken today with the camera that you used as an inspiration for your artwork? If so, which ones, and why? Are there any artworks of peers that resemble your pieces? If so, which ones, and what are the similarities that you noticed? Has this art activity helped you to discover something that you may not have already known about yourself before? If so, what did you learn?
Closure: (Time: approximately 15 minutes): Participants will be asked to share the process they used to develop their pieces with their peers. Throughout this discussion, the art educator will ask them to talk specifically about their inspirations behind their pieces, and how they captured a sense of movement in their artwork. If any participants feel uncomfortable sharing; they can jot down their ideas, or simply listen to the others. Next time, the art educator will continue with the activity if participants have not yet completed their work and/or end up leaving early, and then the group will be introduced to the next project in the unit plan, which involves constructing the claymation characters using clay.
BIBLIOGRAPHY/RESOURCES Haring, K. (1999). Dance (1st ed.). New York, NY: Bulfinch. Szabad-Smyth, L. (2014). Personal Communication: Lecture Notes 2014. Community Art Education-Project/Lesson Plan Guide; Differing Rationales; Project Planning; Brainstorming and Mapping a Lesson Plan. Community Art Education
UNIT TITLE: KIDS CREATE CLAYMATION CHARACTERS IN ACTION
Lesson 2: Constructing 3-Dimensional Characters Using Clay
Objectives:
Learning Objectives: Participants will be introduced to the concept of claymation, and will learn how to create their own characters using simple, non-harmful techniques and tools. In this lesson, participants will learn how to construct their claymation characters using clay and clay tools.****
Social and Community: to teach a group of children to work well together; to create an environment that is inviting, relaxing, and unlike that of school; to hold a space that is safe from physical and/or psychological harm (the space will always be clean and clear of hazardous items upon arrival) and participants will be reminded to avoid using any extreme violence, profanity, nudity, sexuality, and coarse language, should they choose to do so.
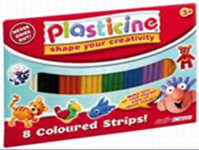
Art-Making: Participants will use their figures that were created on a flat, 2-dimensional surface to construct their 3-dimensional claymation characters in motion using plasticine clay and clay tools. Participants will make a minimum of 2 clay characters.
Art Appreciation: Participants will learn to respond to works of art by a snippet of the feature film, “Wallace and Gromit: The Curse of the Were-Rabbit”, the prototypes of the art facilitator, as well as the works of their peers, and reflections of their own artworks. Response activities include group discussions and reflections regarding the work of the prototype of the art facilitator, one’s artwork, and that of his/her peers. Other response activities include sharing one’s artwork with peers and in a group circle towards the end of the session.
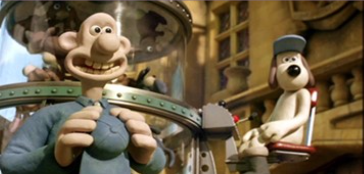
Image 1: Famous example of clay animation: “Wallace & Gromit”, created by Nick Park in 1989 Characters are made out of plasticine clay and armature First feature-length film: “Wallace & Gromit: The Curse of the Were-Rabbit” Trailer: https://www.youtube.com/watch?v=566_PBg6jkE
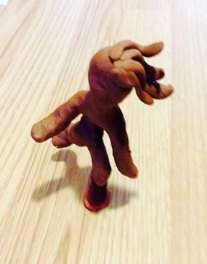
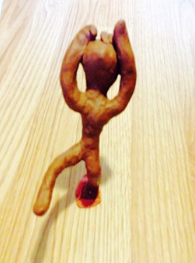
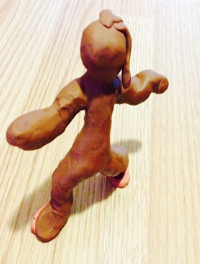
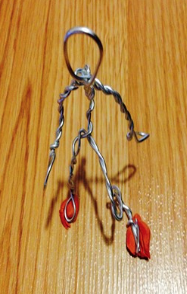
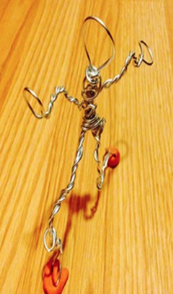
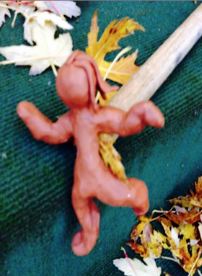
Images below: Prototypes made by the art educator
Materials:
Participants: Participants will not be required to bring any materials.
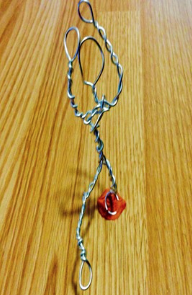
Facilitator: The art educator will assemble the following materials to provide to participants: -Soft Aluminum wire and pliers or strong scissors: the art educator will be in charge of constructing the armature made from the participants’ sketches of the stick figures. The art educator will create 2 armatures out of the top 3 sketches that were chosen, per participant. Completing this process can be quite tedious for the art educator; however, it is suggested in order to prevent possible safety hazards when dealing with sharp tools and wire.


Masking tape (a few rolls for the group of participants) -An abundance of Clay: Plasticine (split evenly between each participant). -Clay Tools (i.e. rolling pin, plastic fork, etc.). -HB pencils, newsprint, erasers: in case participants would like to create a few more rough sketches of stick figures in motion beforehand. -Smocks will be provided to each participant in the form of garbage bags (areas for the head and arms will be cut out). -Brown paper and will be provided to place on the tables.
Constructing the Armature (Examples):
Equipment:
Participants: participants will not be required to bring any equipment.
Facilitator: The art educator will provide a laptop and a smartboard to display visual references, such as the snippet of the feature film, “Wallace and Gromit: The Curse of the Were-Rabbit”.
Motivation: (Time: approximately 10-15 minutes): The following will be used to motivate the art-making process: the ability to create something that has personal relevancy, an opportunity to collaborate with peers based on the way the seats are arranged (tables are placed side by side), and an exploration and discussion regarding the snippet of the feature film and the art educator’s prototype. After exploring the prototype of the art educator and the video clip from the Wallace and Gromit feature film, the art educator will ask the participants to think about and respond to the following questions: What kinds of 3-dimensional shapes and forms can you see that appear in the characters in the clip of the feature film? (i.e. spheres for the head, etc.). What kinds of 3-dimensional shapes and forms can you see that appear in the prototypes created by the art educator? What kinds of shapes and forms would you like to include in your clay figures?
Media Exploration: (Time: approximately 10-15 minutes): The art educator will demonstrate a simple, helpful technique to cover the armature figure with clay, which involves breaking the process down to focus on completing 1 section of the body at a time (i.e. start with a ball for the head, etc.). The art educator will encourage the students to take a few minutes to practice this method using plasticine, to see what they are comfortable with.
Vocabulary Words of Focus and Their Definitions: Plasticine: This is non-hardening clay that is oil-based, and considered to be most commonly used in clay animation for creating soft and movable characters. Fun fact: this type of clay will not harden even when heated or exposed to air and humidity for a long period of time. It is commonly used for children’s play, largely due to the fact that it is non-toxic, sterile, soft, and malleable. Source: http://www.infoplease.com/spot/clay.html.

Similarities and Differences between “2D (two-dimensional) visual artwork” and “3D (three-dimensional) visual artwork”
Similarities: both 2D and 3D artwork can represent real objects and both can hold implied texture
Differences: 2D artwork can be measured in 2 ways: by length and by width, but 3D artwork can be also be measured a third way, which is by volume.
Art-Making: Participants will work from observation, as they construct their clay characters using the constructed armatures as a base/reference. They may also choose to refer to the art educator’s prototype, and the snippet from the feature film for inspiration. Participants will work individually, although they are encouraged to sit side by side and engage in discussion with their peers while they draw. During the art-making process, the art educator will walk around the room and tend to the participants’ needs by (i.e. answering questions, and ensuring that the participants are behaving in a respectful manner, etc.).
Procedure: (Time: approximately 30-35 minutes): The art educator will distribute the newly developed armatures (based on the chosen sketches) to each participant (2 per participant). The art educator will set up the art room to ensure that the materials are distributed evenly and fairly among the participants. Participants are encouraged to discuss ideas and collaborate with their peers across the room. At this point, participants can begin the process of covering their constructed armatures with masking tape (this can facilitate the task of attaching the plasticine). Participants will cover their armatures with plasticine, creating their clay figures in motion. When participants are finished their artwork, they can trade them with a partner or a small group.
Response to Art (Incorporated in the Closure Period): When participants are finished, or close to finishing, the group will gather around in a circle to discuss the following questions as a group: What kinds of shapes/forms did you use to construct your clay characters? What kinds of techniques did you use to construct your clay characters? (i.e. completing one section at a time, then attaching the sections together). Did you find it helpful to use the armature as a guide? Has this art activity helped you to discover something that you may not have already known about yourself before? If so, what did you learn?
Closure: (Time: approximately 15 minutes): Participants will be asked to share the concept of their pieces with their peers. Throughout this discussion, the art educator will ask them to talk specifically about the process they used to develop their pieces, and the types of 3-dimensional shapes and forms that were used. The art educator will also ask students to comment on personal references within the pieces (i.e. how do you feel about the final result? does this piece capture what you were trying to perceive?). If any participants feel uncomfortable sharing; they can jot down their ideas, or simply listen to the others. Next time, the art educator will continue with the activity if participants have not yet completed their work and/or end up leaving early, and then the group will be introduced to the next project in the unit plan, which involves a digital animation of the clay characters.
BIBLIOGRAPHY/RESOURCES Szabad-Smyth, L. (2014). Personal Communication: Lecture Notes 2014. Community Art Education-Project/Lesson Plan Guide; Differing Rationales; Project Planning; Brainstorming and Mapping a Lesson Plan. Wallace and Gromit (2009). “Wallace & Gromit: The Curse of the Were-Rabbit Trailer”. Retrieved 20 November 2015 from: https://www.youtube.com/watch?v=566_PBg6jkE Community Art Education.
UNIT TITLE: KIDS CREATE CLAYMATION CHARACTERS
Lesson 3: Bringing the Clay Characters to Life through Digital Animation
Objectives:
Learning Objectives: Participants will learn how to take a photo using an IPhone 4. ****They will also learn 1 method of bringing their clay characters to life through digital animation in the form of a GIF.
Social and Community: to teach a group of children to work well together; to create an environment that is inviting, relaxing, and unlike that of school, and to hold a space that is safe from physical and/or psychological harm.
Art-Making: Participants will capture photos of their clay characters in 3 different positions (upright, upside down, and climbing) in an outdoor setting. Participants will use these images to create their own GIFS using the GIF Maker APP.
Art Appreciation: Participants will learn to respond to works of art by the prototypes of the art facilitator, as well as images from the Slinkachu Street Installation selections. They will also respond to works of their peers, and reflect on their own artworks. Response activities include group discussions and reflections regarding the work of the prototype of the art facilitator, images from the Slinkachu Street Installations, one’s artwork, and that of his/her peers. Other response activities include sharing one’s artwork with peers and in a group circle towards the end of the session.
Examples of images from the Slinkachu selection of Street Installations:
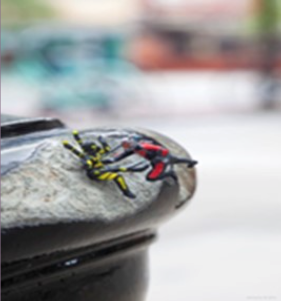
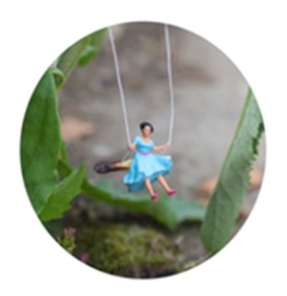
Source: http://little-people.blogspot.ca/
Materials:
Students: Participants will not be required to bring any materials.
Facilitator: The art educator will assemble the following materials to provide to participants: -HB pencils, erasers (for optional rough sketches) -Newsprint (a few sheets per participant for optional rough sketches) -Extra pieces of plasticine (to help stick the clay characters to objects outside when capturing photos) ****
Equipment: Students: participants will not be required to bring any equipment. Facilitator: The art educator will provide IPhones with the Animated GIF Maker APP already installed (1 IPhone per participant). The art educator will also use a laptop and smart board.
Media Exploration: (Time: approximately 25 minutes): The art educator will demonstrate how to use the IPhone 4 camera and the Animated GIF Maker APP with visuals documenting a step-by-step process.
IPhone 4 Camera:
Step #1: Tap the “Camera” button to select and open the IPhone Camera.
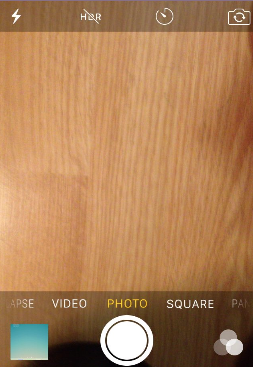
Step #2: Make sure that the “Photo” Option is highlighted, and tap the white circle symbol to take a photo. Photos will enter a photos folder, where you can then retrieve them when you would like.
Animated GIF Maker APP
Step #1: Tap the GIF Maker APP to open the APP (which has already been installed on the IPhone)
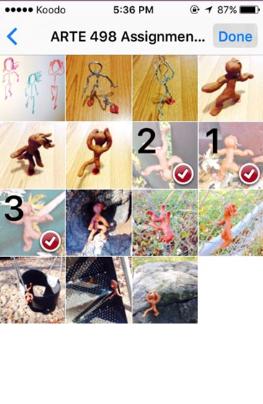
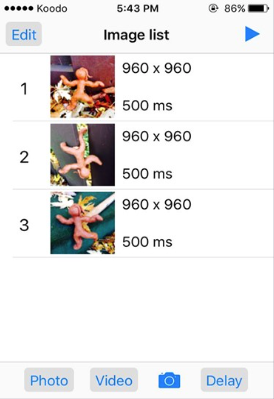
Step #2: On the “Image List Page”, Tap “Photo”

Step #3: Select the photos that you would like to include in your GIF by tapping them. Once selected, tap “done”, and these images will enter in your image list. Note: The art educator will ask the participants to select 3 photos that they will take of their characters in different positions. This process will be explained in the procedure section.
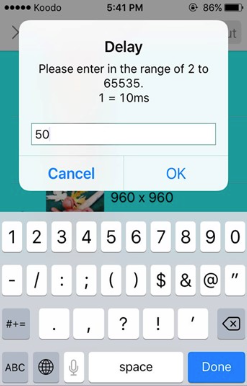
Step #4: Tap “Delay”, “Select All” and “Input”.
Then type in 50 in the white box, and tap “OK”.
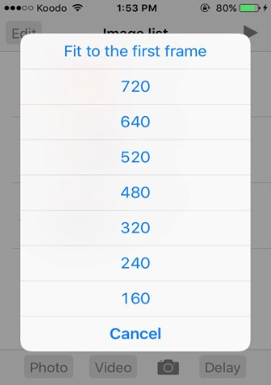
Step #5: Tap the “Play button (Triangle symbol)” on the top right- hand corner of the screen. Tap “Fit to the first frame”.
Step #6: At this point, your GIF will appear, and if you are satisfied with the final product, you can go ahead and tap “save image”.

Vocabulary Words of Focus and Their Definitions: GIF: A form of computer images that moves as a digital animation, because it consists of frames, like a movie with no sound. Source: http://dictionary.reference.com/browse/gif
Art-Making: Participants will work from observation and imagination. They will follow the techniques displayed by the art educator to take photos using their IPhones, and in the animated GIF maker APP to create their respective GIFS. They may choose to work from imagination or refer to the art educator’s prototypes, and/or the Slinkachu street installations for inspiration when it comes to details regarding the types of photos that are taken.
Procedure: (Time: approximately 45 minutes): Participants will choose 1 clay character to animate (out of the 2 that were constructed). The art educator and the participants will travel outside of the room with the IPhones and their clay characters into a safe and confined environment outdoors with access to nature (i.e. a nearby park). The art educator will ask the participants to focus on 3 character positions to take photos of with their IPhones: 1) Upright 2) Upside down 3) Climbing.
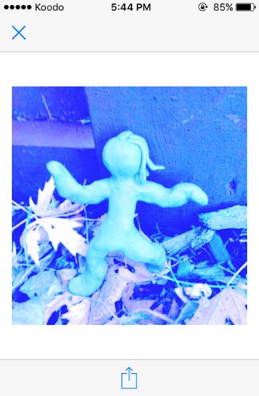
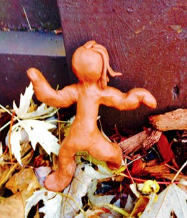
Examples of characters in the UPRIGHT position outside:
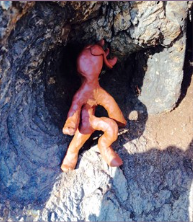

Examples of characters in the UPSIDE DOWN position outside:
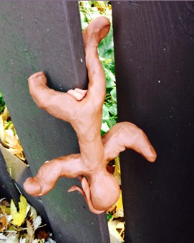
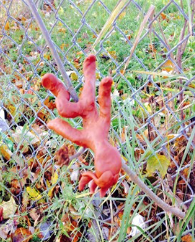
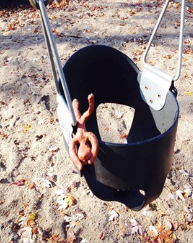
Examples of characters in the CLIMBING position outside:
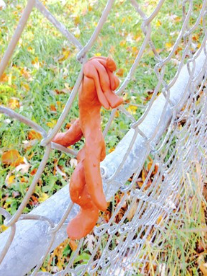
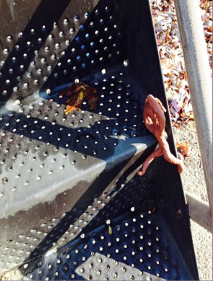
Participants will explore their environment and capture 3 photos of their clay characters in the positions (1 in the upright position, 1 in the upside down position, and 1 in the climbing position). Participants are encouraged to take each photo in a different area. Participants can use extra clay pieces to stick to the objects outside. Participants are encouraged to use the art educator’s prototypes as well as the images of the Slinkachu street installations as sources of inspiration with regards to the placement of the characters and the background setting of their photos. Once the participants have finished taking their photos and they are satisfied with their results, the participants and the art educator will travel back inside. At this point, the art educator will break down the steps used to create the animated GIF (from the media exploration section) again, as the participants create their GIFS.
Response to Art (Incorporated in the Closure Period): When participants are finished, or close to finishing, the art educator will collect the GIFS and display them all at once on the smart board. Note: uploading multiple GIFS at once is great as it highlights different perspectives and understandings of the assignment from the participants. The group will gather around in a circle to discuss the following questions as a group: What kinds of objects did you use for the placement of your characters outside and why? What kinds of settings did you use for the background of your images and why? How did you find the experience of using an IPhone to capture your images and turn them into digital animations using the GIF Maker APP? Are there any artworks that you used as inspiration for your art pieces? (i.e. art educator’s prototypes, pictures from the Slinkachu street installations) Has this art activity helped you to discover something that you may not have already known about yourself before? If so, what did you learn?
Closure: (Time: approximately 10-15 minutes): Participants will be asked to share the concept of their pieces with their peers. Throughout this discussion, the art educator will ask them to talk specifically about the inspirations that they used to develop their pieces. The art educator will also ask students to comment on personal references within the pieces (i.e. how do you feel about the final result? does this piece capture what you were trying to perceive?). If any participants feel uncomfortable sharing; they can jot down their ideas, or simply listen to the others. Next time, the art educator will allow participants to continue with the activity if they have not yet completed their work and/or end up leaving early.
BIBLIOGRAPHY/RESOURCES Slinkachu (2015). Little People: A Selection of Street Installations. Retrieved 25 November 2015 from: http://www.slinkachu.com/. Szabad-Smyth, L. (2014). Personal Communication: Lecture Notes 2014. Community Art Education-Project/Lesson Plan Guide; Differing Rationales; Project Planning; Brainstorming and Mapping a Lesson Plan. Taylor, R. (1996). Encyclopedia of animation techniques. London: Focal Press.
Copyright © 2025 InArte Journal. All rights reserved