Alyssa Archer-Cooper
Art Education major
Kids Create Claymation Characters in Action! A Guide for Art Educators in the Community Art Setting
Lesson Plan
UNIT PLAN
UNIT TITLE: KIDS CREATE CLAYMATION CHARACTERS IN ACTION!
Art Educator: Alyssa Archer-Cooper
Location: Community Art Education Settings
Population: Who: children who are part of a community group program with varying degrees of artistic skills. Age: The activities are designed for children aged 9 to 12 Number of sessions for this unit plan: 3 sessions total The unit plan comprises of a total of 3 sessions, with 1 hour and 30 minutes of time dedicated to each session, for a total of 4 hours and 30 minutes for all 3 sessions combined.
MEQ Competencies: Competency #2: Creates media images. Competency #3: Appreciates works of art.
Rationale: This unit plan is specifically geared towards young participants in art programs/art initiatives within the community. Participants may differ in age and maturity levels, and may have varying degrees of artistic skills, based on their exposure to art in school, at home, and/or at a community center. The community setting should act as a safe space where participants can create a sense of bonding with the community through various art activities. The artworks produced should give the participants a sense of pride, joy, ownership, and accomplishment. Whether these participants are coming from low-income homes where poverty is prevalent, or from families with a high socio-economic status, the community setting is meant to make everyone feel welcome, and create a sense of belonging. Furthermore, these participants are at the ages where their levels of creativity and imagination are at an all-time high. Being able to assist a mentor and facilitate art courses in a previous semester in a community art studio with participants around the same age has allowed me to see this in-depth, based on the progression of the art pieces. These are all valuable sources of information that I kept in mind when developing my unit plan. Essentially, I chose this unit because I wanted to give the participants an outlet to express their creative thoughts on paper, while introducing them to new and exciting concepts, techniques, and digital media that they may not have been exposed to before.
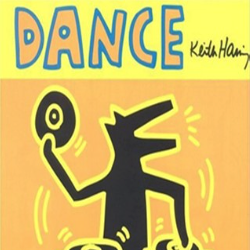
Unit Plan Focus: The community art education theory and practice course aims to explore the influences that culture and service learning (among other factors) can have on the context of teaching within a community setting, with an emphasis on the development of both artistic and pedagogical practices that are personal and professional (Wicks, Course Outline, 2015). The lessons that make up this unit plan are structured in such a way where participants have an opportunity to create their own clay animation characters, crafted from initial sketches that are transformed into 3-dimensional figures that express an action. Participants are introduced to different art mediums and techniques in each activity, and the lessons are completed in steps (in progression) to eventually form one final digitally animated piece, which incorporates elements of the artworks from each lesson. The focus of the unit plan is to introduce a variety of art concepts, techniques, artists, and digital resources to the participants in an engaging, and unique way that will encourage them to think outside the box when creating their respective art pieces. Participants will explore the work of artists, such as Keith Haring, and Nick Park, as well as the work of the art educator, in the form of prototypes to construct 3-dimensional characters in motion, using clay. The participants will also learn media skills, such as how to capture photos using an IPhone, and how to create a digital animation with the images. These new acquired skills will manifest itself in the form of a GIF that they will develop progressively over the 3 lessons with the help of the art facilitator.
Bibliography/Resources: Taylor, R. (1996). Encyclopedia of animation techniques. London: Focal Press. Wicks, J. (2015). Personal Communication: Course Outline 2015. Community Art Education
UNIT TITLE: KIDS CREATE CLAYMATION CHARACTERS IN ACTION!
Lesson 1: The Expression of Movement
Objectives:
Learning Objectives: Participants will be introduced to the concept of claymation and will learn how to create their own characters using simple, non-harmful techniques and tools. In this lesson, participants will learn how to express movement in their art pieces using drawing tools.
Social and Community: to teach a group of children to work well together; to create an environment that is inviting and relaxing; to hold a space that is safe from physical and/or psychological harm (the space will always be clean and clear of hazardous items).
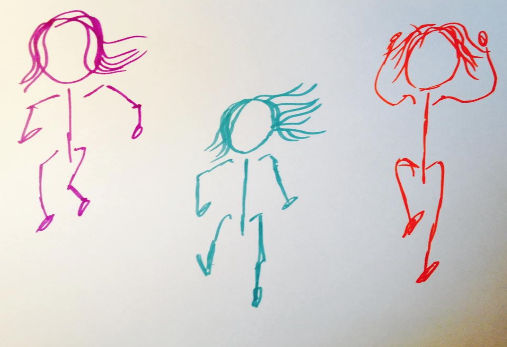
Art-Making: Participants will explore ways in which the effect of movement can be established on a flat, 2D surface, using drawing tools. Participants will make a minimum of 10 different drawings/sketches of stick figures which demonstrate the effect of movement.
Art Appreciation: Participants will learn to respond to works of art by artist, Keith Haring, as well as the works of their art educator, their peers, and reflections of their own artworks. Response activities include group discussions and reflections regarding the work of the author, one’s artwork, and that of his/her peers. Other response activities include sharing one’s with peers towards the end of the session.
Materials: Participants: Participants will not be required to bring any materials.
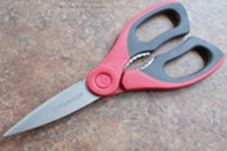
Facilitator: The art educator will assemble the following materials to provide to the participants: -HB pencils (for participants to make quick sketches of their stick figures in motion) -Erasers (for rough sketches) -Newsprint sheets (for rough sketches). -Brown paper and will be provided to place on the tables.
Equipment and Support Materials:
Participants: Participants will not be required to bring any equipment.
Facilitator: The art educator will bring in SLR cameras and tripods (to capture students in action, as well as a laptop and smart board. The art educator will also bring in the book entitled, “Dance”, by Keith Haring.
Motivation: (Time: approximately 10 minutes): The following will be used to motivate the art-making process: the ability to create something that has personal relevancy, an opportunity to collaborate with peers based on the way the seats are arranged (tables are placed side by side), and an exploration and discussion regarding the artwork displayed in Keith Haring’s book entitled, “Dance”. After the exploring the images from Haring’s book, the art educator will ask the participants to think about/respond to the following questions: What kinds of lines and shapes do you notice the artist using to create figures that are in motion? How is the artist using the lines and shapes to create figures that are in motion?
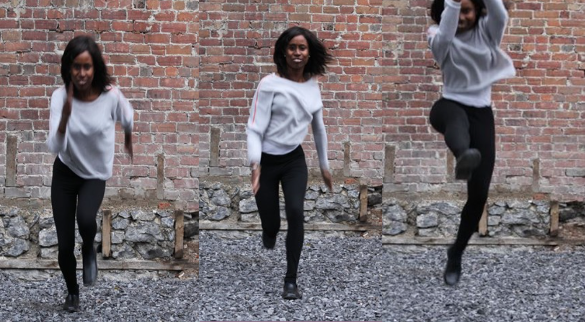
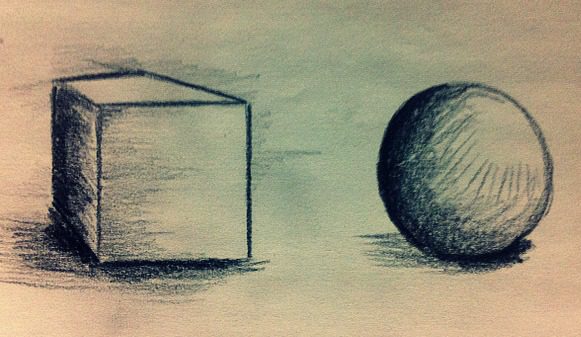
Media Exploration Activity: (Time: approximately 20 minutes): The art educator will set up some SLR cameras on tripods to capture the students in motion. The art educator will set the cameras up on the tripods in advance on auto mode with continuous shooting, and get a few students to perform a simple action such as running or jumping.
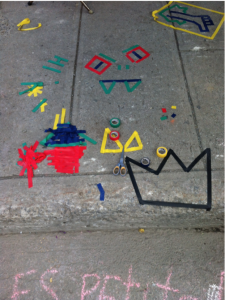
Examples of Action Shots:
Vocabulary Words of Focus and Their Definitions:
Movement/motion: Physical actions that are performed by a person
2D work of art: having its elements organized in terms of a flat surface, emphasis Source: http://dictionary.reference.com/browse/two-dimensional
SLR Camera: The term, “SLR” stands for: single lens reflex. With an SLR camera, you see exactly what the lens sees. They have large image sensors that produce high-quality photos. Overall, an SLR camera is ideal for action photography. Source: http://www.digital-slr-guide.com/what-is-a-digital-slr.html
Art-Making: Participants will work primarily from observation. The goal of this lesson is for participants to make a minimum of 10 sketches of stick figures, and it is important that these pieces showcase figures that are in the process of moving (i.e. a person who is running). Participants will have an opportunity to experiment with the SLR camera by performing simple actions that are taken with the camera and/or taking the photos themselves. They will then work individually when creating art pieces that match the characters in motion. Participants will work primarily from observation, as they will be using the pictures displayed in Keith Haring’s book as well as the action photos of themselves and/or their peers/art educator as a reference for their own art pieces. Participants will work individually, although they are encouraged to sit side by side and engage in discussion with their peers while they draw. During the art-making process, the art educator will walk around the room and tend to the participants’ needs by (i.e. answering questions, ensuring that the participants are behaving in a respectful manner, etc.).
Procedure: (Time: approximately 35-40 minutes):
1. After the media exploration activity, the art educator will ask participants to split up into groups of 2 to practice using their bodies to perform simple actions, such as running or jumping. They will take turns both in front of the camera and behind the camera. Remember that the art educator will have set the cameras up on the tripods in advance on auto mode with continuous shooting to make it easier for the participants. At this time, the art educator will walk around and help with resetting the cameras/tripods if there are any issues.
2. The art educator will use the laptop to transfer, save and display the pictures taken by the students on the smart board during the session.
3. The participants will create a minimum of 10 very basic stick figures in motion using pieces of paper, pencils and erasers. Participants are encouraged to refer to the photos taken during the session, as well as images from Keith Haring’s book, “Dance” for inspiration.
4. When participants are finished their artwork, they will circle their top 3 favorite sketches before handing their work in to the art educator.
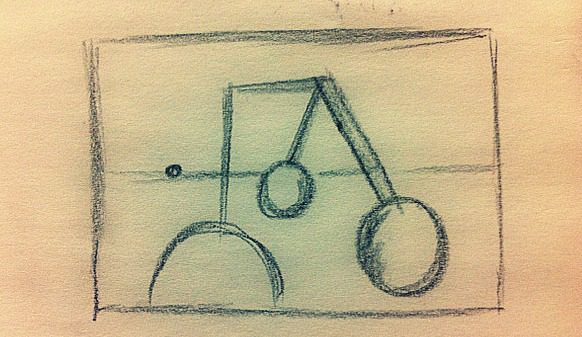
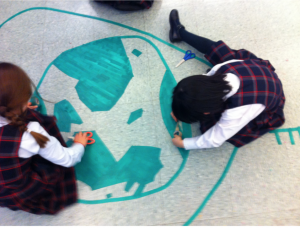
Examples of stick figure drawings in motion:
Response to Art (Incorporated in the Closure Period): When participants are finished, or close to finishing, the group will gather around in a circle to discuss the following questions as a group: Were there any images from Haring’s book that you used as an inspiration for your artwork? If so, which ones, and why? Were there any photos that were taken today with the camera that you used as an inspiration for your artwork? If so, which ones, and why? Are there any artworks of peers that resemble your pieces? If so, which ones, and what are the similarities that you noticed? Has this art activity helped you to discover something that you may not have already known about yourself before? If so, what did you learn?
Closure: (Time: approximately 15 minutes): Participants will be asked to share the process they used to develop their pieces with their peers. Throughout this discussion, the art educator will ask them to talk specifically about their inspirations behind their pieces, and how they captured a sense of movement in their artwork. If any participants feel uncomfortable sharing; they can jot down their ideas, or simply listen to the others. Next time, the art educator will continue with the activity if participants have not yet completed their work and/or end up leaving early, and then the group will be introduced to the next project in the unit plan, which involves constructing the claymation characters using clay.
BIBLIOGRAPHY/RESOURCES Haring, K. (1999). Dance (1st ed.). New York, NY: Bulfinch. Szabad-Smyth, L. (2014). Personal Communication: Lecture Notes 2014. Community Art Education-Project/Lesson Plan Guide; Differing Rationales; Project Planning; Brainstorming and Mapping a Lesson Plan. Community Art Education
UNIT TITLE: KIDS CREATE CLAYMATION CHARACTERS IN ACTION
Lesson 2: Constructing 3-Dimensional Characters Using Clay
Objectives:
Learning Objectives: Participants will be introduced to the concept of claymation, and will learn how to create their own characters using simple, non-harmful techniques and tools. In this lesson, participants will learn how to construct their claymation characters using clay and clay tools.****
Social and Community: to teach a group of children to work well together; to create an environment that is inviting, relaxing, and unlike that of school; to hold a space that is safe from physical and/or psychological harm (the space will always be clean and clear of hazardous items upon arrival) and participants will be reminded to avoid using any extreme violence, profanity, nudity, sexuality, and coarse language, should they choose to do so.
Art-Making: Participants will use their figures that were created on a flat, 2-dimensional surface to construct their 3-dimensional claymation characters in motion using plasticine clay and clay tools. Participants will make a minimum of 2 clay characters.
Art Appreciation: Participants will learn to respond to works of art by a snippet of the feature film, “Wallace and Gromit: The Curse of the Were-Rabbit”, the prototypes of the art facilitator, as well as the works of their peers, and reflections of their own artworks. Response activities include group discussions and reflections regarding the work of the prototype of the art facilitator, one’s artwork, and that of his/her peers. Other response activities include sharing one’s artwork with peers and in a group circle towards the end of the session.
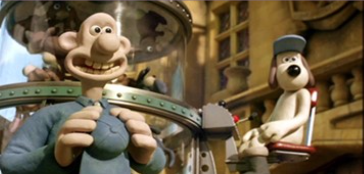
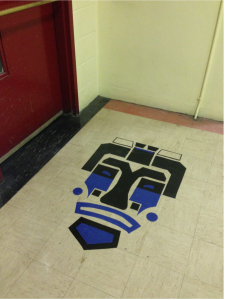
Image 1: Famous example of clay animation: “Wallace & Gromit”, created by Nick Park in 1989 Characters are made out of plasticine clay and armature First feature-length film: “Wallace & Gromit: The Curse of the Were-Rabbit” Trailer: https://www.youtube.com/watch?v=566_PBg6jkE
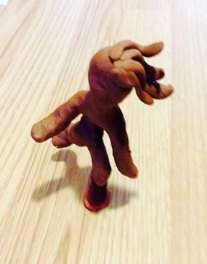
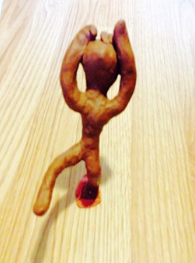
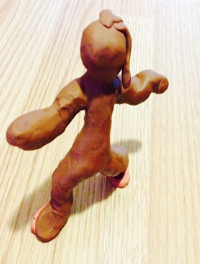
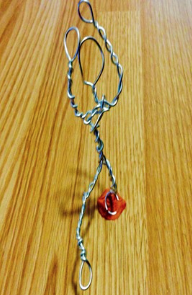
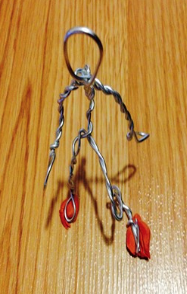
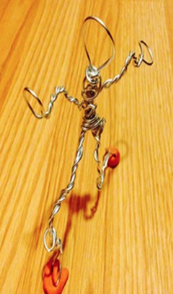
Images below: Prototypes made by the art educator
Materials:
Participants: Participants will not be required to bring any materials.
Facilitator: The art educator will assemble the following materials to provide to participants: -Soft Aluminum wire and pliers or strong scissors: the art educator will be in charge of constructing the armature made from the participants’ sketches of the stick figures. The art educator will create 2 armatures out of the top 3 sketches that were chosen, per participant. Completing this process can be quite tedious for the art educator; however, it is suggested in order to prevent possible safety hazards when dealing with sharp tools and wire.

Masking tape (a few rolls for the group of participants) -An abundance of Clay: Plasticine (split evenly between each participant). -Clay Tools (i.e. rolling pin, plastic fork, etc.). -HB pencils, newsprint, erasers: in case participants would like to create a few more rough sketches of stick figures in motion beforehand. -Smocks will be provided to each participant in the form of garbage bags (areas for the head and arms will be cut out). -Brown paper and will be provided to place on the tables.
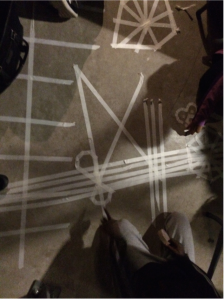
Constructing the Armature (Examples):
Equipment:
Participants: participants will not be required to bring any equipment.
Facilitator: The art educator will provide a laptop and a smartboard to display visual references, such as the snippet of the feature film, “Wallace and Gromit: The Curse of the Were-Rabbit”.
Motivation: (Time: approximately 10-15 minutes): The following will be used to motivate the art-making process: the ability to create something that has personal relevancy, an opportunity to collaborate with peers based on the way the seats are arranged (tables are placed side by side), and an exploration and discussion regarding the snippet of the feature film and the art educator’s prototype. After exploring the prototype of the art educator and the video clip from the Wallace and Gromit feature film, the art educator will ask the participants to think about and respond to the following questions: What kinds of 3-dimensional shapes and forms can you see that appear in the characters in the clip of the feature film? (i.e. spheres for the head, etc.). What kinds of 3-dimensional shapes and forms can you see that appear in the prototypes created by the art educator? What kinds of shapes and forms would you like to include in your clay figures?
Media Exploration: (Time: approximately 10-15 minutes): The art educator will demonstrate a simple, helpful technique to cover the armature figure with clay, which involves breaking the process down to focus on completing 1 section of the body at a time (i.e. start with a ball for the head, etc.). The art educator will encourage the students to take a few minutes to practice this method using plasticine, to see what they are comfortable with.
Vocabulary Words of Focus and Their Definitions: Plasticine: This is non-hardening clay that is oil-based, and considered to be most commonly used in clay animation for creating soft and movable characters. Fun fact: this type of clay will not harden even when heated or exposed to air and humidity for a long period of time. It is commonly used for children’s play, largely due to the fact that it is non-toxic, sterile, soft, and malleable. Source: http://www.infoplease.com/spot/clay.html.

Similarities and Differences between “2D (two-dimensional) visual artwork” and “3D (three-dimensional) visual artwork”
Similarities: both 2D and 3D artwork can represent real objects and both can hold implied texture
Differences: 2D artwork can be measured in 2 ways: by length and by width, but 3D artwork can be also be measured a third way, which is by volume.
Art-Making: Participants will work from observation, as they construct their clay characters using the constructed armatures as a base/reference. They may also choose to refer to the art educator’s prototype, and the snippet from the feature film for inspiration. Participants will work individually, although they are encouraged to sit side by side and engage in discussion with their peers while they draw. During the art-making process, the art educator will walk around the room and tend to the participants’ needs by (i.e. answering questions, and ensuring that the participants are behaving in a respectful manner, etc.).
Procedure: (Time: approximately 30-35 minutes): The art educator will distribute the newly developed armatures (based on the chosen sketches) to each participant (2 per participant). The art educator will set up the art room to ensure that the materials are distributed evenly and fairly among the participants. Participants are encouraged to discuss ideas and collaborate with their peers across the room. At this point, participants can begin the process of covering their constructed armatures with masking tape (this can facilitate the task of attaching the plasticine). Participants will cover their armatures with plasticine, creating their clay figures in motion. When participants are finished their artwork, they can trade them with a partner or a small group.
Response to Art (Incorporated in the Closure Period): When participants are finished, or close to finishing, the group will gather around in a circle to discuss the following questions as a group: What kinds of shapes/forms did you use to construct your clay characters? What kinds of techniques did you use to construct your clay characters? (i.e. completing one section at a time, then attaching the sections together). Did you find it helpful to use the armature as a guide? Has this art activity helped you to discover something that you may not have already known about yourself before? If so, what did you learn?
Closure: (Time: approximately 15 minutes): Participants will be asked to share the concept of their pieces with their peers. Throughout this discussion, the art educator will ask them to talk specifically about the process they used to develop their pieces, and the types of 3-dimensional shapes and forms that were used. The art educator will also ask students to comment on personal references within the pieces (i.e. how do you feel about the final result? does this piece capture what you were trying to perceive?). If any participants feel uncomfortable sharing; they can jot down their ideas, or simply listen to the others. Next time, the art educator will continue with the activity if participants have not yet completed their work and/or end up leaving early, and then the group will be introduced to the next project in the unit plan, which involves a digital animation of the clay characters.
BIBLIOGRAPHY/RESOURCES Szabad-Smyth, L. (2014). Personal Communication: Lecture Notes 2014. Community Art Education-Project/Lesson Plan Guide; Differing Rationales; Project Planning; Brainstorming and Mapping a Lesson Plan. Wallace and Gromit (2009). “Wallace & Gromit: The Curse of the Were-Rabbit Trailer”. Retrieved 20 November 2015 from: https://www.youtube.com/watch?v=566_PBg6jkE Community Art Education.
UNIT TITLE: KIDS CREATE CLAYMATION CHARACTERS
Lesson 3: Bringing the Clay Characters to Life through Digital Animation
Objectives:
Learning Objectives: Participants will learn how to take a photo using an IPhone 4. ****They will also learn 1 method of bringing their clay characters to life through digital animation in the form of a GIF.
Social and Community: to teach a group of children to work well together; to create an environment that is inviting, relaxing, and unlike that of school, and to hold a space that is safe from physical and/or psychological harm.
Art-Making: Participants will capture photos of their clay characters in 3 different positions (upright, upside down, and climbing) in an outdoor setting. Participants will use these images to create their own GIFS using the GIF Maker APP.
Art Appreciation: Participants will learn to respond to works of art by the prototypes of the art facilitator, as well as images from the Slinkachu Street Installation selections. They will also respond to works of their peers, and reflect on their own artworks. Response activities include group discussions and reflections regarding the work of the prototype of the art facilitator, images from the Slinkachu Street Installations, one’s artwork, and that of his/her peers. Other response activities include sharing one’s artwork with peers and in a group circle towards the end of the session.
Examples of images from the Slinkachu selection of Street Installations:
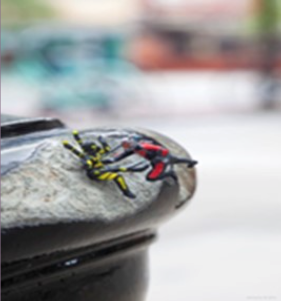
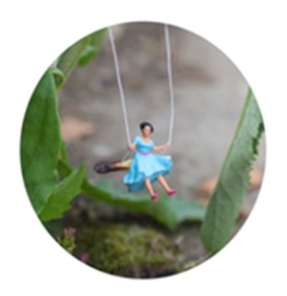
Source: http://little-people.blogspot.ca/
Materials:
Students: Participants will not be required to bring any materials.
Facilitator: The art educator will assemble the following materials to provide to participants: -HB pencils, erasers (for optional rough sketches) -Newsprint (a few sheets per participant for optional rough sketches) -Extra pieces of plasticine (to help stick the clay characters to objects outside when capturing photos) ****
Equipment: Students: participants will not be required to bring any equipment. Facilitator: The art educator will provide IPhones with the Animated GIF Maker APP already installed (1 IPhone per participant). The art educator will also use a laptop and smart board.
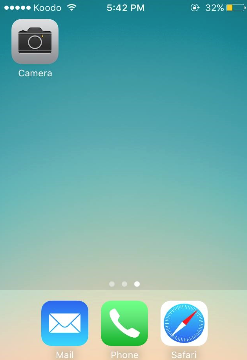
Media Exploration: (Time: approximately 25 minutes): The art educator will demonstrate how to use the IPhone 4 camera and the Animated GIF Maker APP with visuals documenting a step-by-step process.
IPhone 4 Camera:
Step #1: Tap the “Camera” button to select and open the IPhone Camera.
Step #2: Make sure that the “Photo” Option is highlighted, and tap the white circle symbol to take a photo. Photos will enter a photos folder, where you can then retrieve them when you would like.
Animated GIF Maker APP
Step #1: Tap the GIF Maker APP to open the APP (which has already been installed on the IPhone)
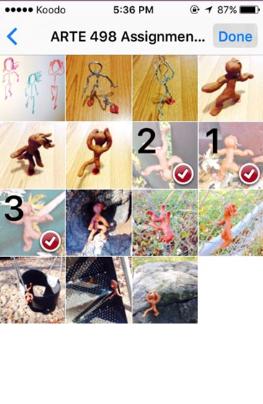
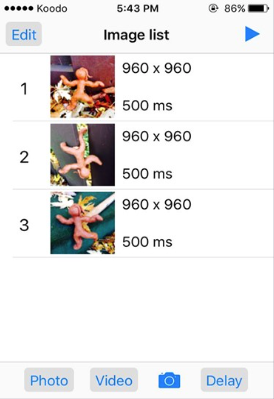
Step #2: On the “Image List Page”, Tap “Photo”

Step #3: Select the photos that you would like to include in your GIF by tapping them. Once selected, tap “done”, and these images will enter in your image list. Note: The art educator will ask the participants to select 3 photos that they will take of their characters in different positions. This process will be explained in the procedure section.
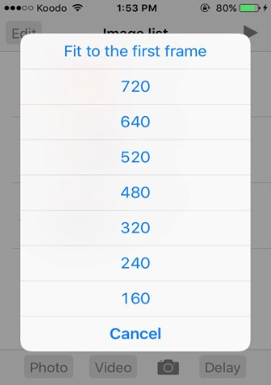
Step #4: Tap “Delay”, “Select All” and “Input”.
Then type in 50 in the white box, and tap “OK”.

Step #5: Tap the “Play button (Triangle symbol)” on the top right- hand corner of the screen. Tap “Fit to the first frame”.
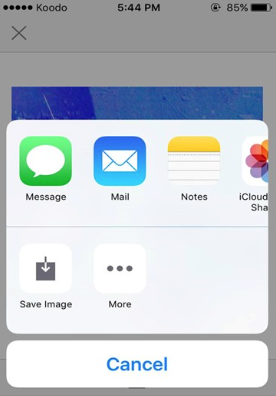
Step #6: At this point, your GIF will appear, and if you are satisfied with the final product, you can go ahead and tap “save image”.
Vocabulary Words of Focus and Their Definitions: GIF: A form of computer images that moves as a digital animation, because it consists of frames, like a movie with no sound. Source: http://dictionary.reference.com/browse/gif
Art-Making: Participants will work from observation and imagination. They will follow the techniques displayed by the art educator to take photos using their IPhones, and in the animated GIF maker APP to create their respective GIFS. They may choose to work from imagination or refer to the art educator’s prototypes, and/or the Slinkachu street installations for inspiration when it comes to details regarding the types of photos that are taken.
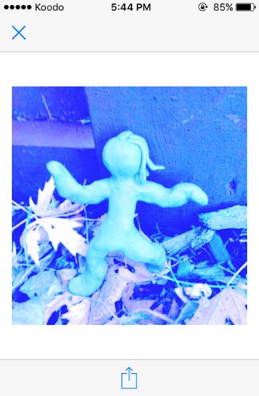
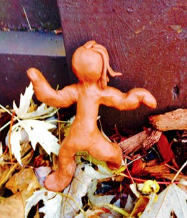
Procedure: (Time: approximately 45 minutes): Participants will choose 1 clay character to animate (out of the 2 that were constructed). The art educator and the participants will travel outside of the room with the IPhones and their clay characters into a safe and confined environment outdoors with access to nature (i.e. a nearby park). The art educator will ask the participants to focus on 3 character positions to take photos of with their IPhones: 1) Upright 2) Upside down 3) Climbing.
Examples of characters in the UPRIGHT position outside:
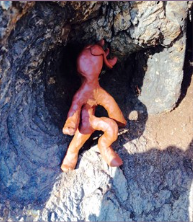

Examples of characters in the UPSIDE DOWN position outside:
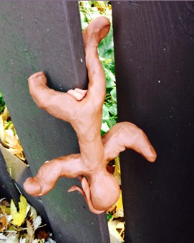
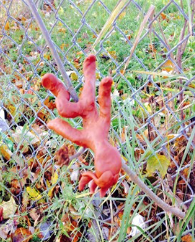
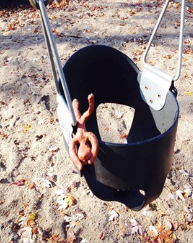
Examples of characters in the CLIMBING position outside:
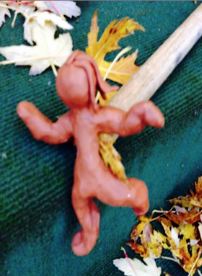
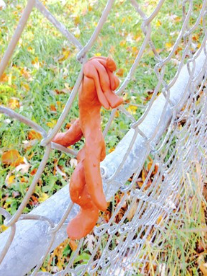
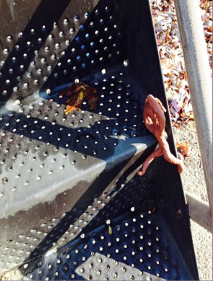
Participants will explore their environment and capture 3 photos of their clay characters in the positions (1 in the upright position, 1 in the upside down position, and 1 in the climbing position). Participants are encouraged to take each photo in a different area. Participants can use extra clay pieces to stick to the objects outside. Participants are encouraged to use the art educator’s prototypes as well as the images of the Slinkachu street installations as sources of inspiration with regards to the placement of the characters and the background setting of their photos. Once the participants have finished taking their photos and they are satisfied with their results, the participants and the art educator will travel back inside. At this point, the art educator will break down the steps used to create the animated GIF (from the media exploration section) again, as the participants create their GIFS.
Response to Art (Incorporated in the Closure Period): When participants are finished, or close to finishing, the art educator will collect the GIFS and display them all at once on the smart board. Note: uploading multiple GIFS at once is great as it highlights different perspectives and understandings of the assignment from the participants. The group will gather around in a circle to discuss the following questions as a group: What kinds of objects did you use for the placement of your characters outside and why? What kinds of settings did you use for the background of your images and why? How did you find the experience of using an IPhone to capture your images and turn them into digital animations using the GIF Maker APP? Are there any artworks that you used as inspiration for your art pieces? (i.e. art educator’s prototypes, pictures from the Slinkachu street installations) Has this art activity helped you to discover something that you may not have already known about yourself before? If so, what did you learn?
Closure: (Time: approximately 10-15 minutes): Participants will be asked to share the concept of their pieces with their peers. Throughout this discussion, the art educator will ask them to talk specifically about the inspirations that they used to develop their pieces. The art educator will also ask students to comment on personal references within the pieces (i.e. how do you feel about the final result? does this piece capture what you were trying to perceive?). If any participants feel uncomfortable sharing; they can jot down their ideas, or simply listen to the others. Next time, the art educator will allow participants to continue with the activity if they have not yet completed their work and/or end up leaving early.
BIBLIOGRAPHY/RESOURCES Slinkachu (2015). Little People: A Selection of Street Installations. Retrieved 25 November 2015 from: http://www.slinkachu.com/. Szabad-Smyth, L. (2014). Personal Communication: Lecture Notes 2014. Community Art Education-Project/Lesson Plan Guide; Differing Rationales; Project Planning; Brainstorming and Mapping a Lesson Plan. Taylor, R. (1996). Encyclopedia of animation techniques. London: Focal Press.
Bianca Ambrosino
Art Education major
The Ride of a Lifetime: The IMAQUEST Amusement Park Contract
The newest and coolest amusement park called IMAQUEST is looking for a team to hire to design a ride that is impossible to find anywhere else! What ride can you and your team create that will blow IMAQUEST AWAY? How will you get the contract?
The cross curricular art education unit for high school students involves four parts:
1) planning and sketching,
2) building and painting,
3) embellishing, and
4) final presentation.
It was designed to allow students to use the skills they learn in both the visual arts and sciences in a practical way in order to create a thoughtful and well designed piece.
Step 1: Design Your Ride
Rationale
Students will create a pencil drawing that illustrates the concept design of their imagined amusement park ride, while exploring the terms and techniques of 3D shapes, value, depth and texture. To build excitement about the project, the educator shows the work “Dismaland” by street artist Banksy, and the mockumentary, “The Centrifuge Brain Project” BY Till Nowak to students. Both works explore imaginary and impossible amusement rides!
Art Objectives
Vocabulary
Materials
Paper, pencil kit, eraser
Competencies
Visual Arts
Cross Curricular
Motivation & Response Questions
The newest and coolest amusement park called IMAQUEST is looking for a team to hire to design a ride that is impossible to find anywhere else! What ride can you and your team create that will blow IMAQUEST AWAY? How will you get the contract?
Questions about own art
How did you use techniques to convey your concept? Did you manage to try all the techniques shown? What improvement do you see in your skills?
Questions about peers art, Banksy and Nowak
What makes the work and rides so unique and impossible? Which rides inspired you the most? Which ride would you definitely run to at an amusement park for? How did the artists and peers convey their ride ideas through their pieces? What techniques did they use?
Step 2: Build Your Ride
Rationale
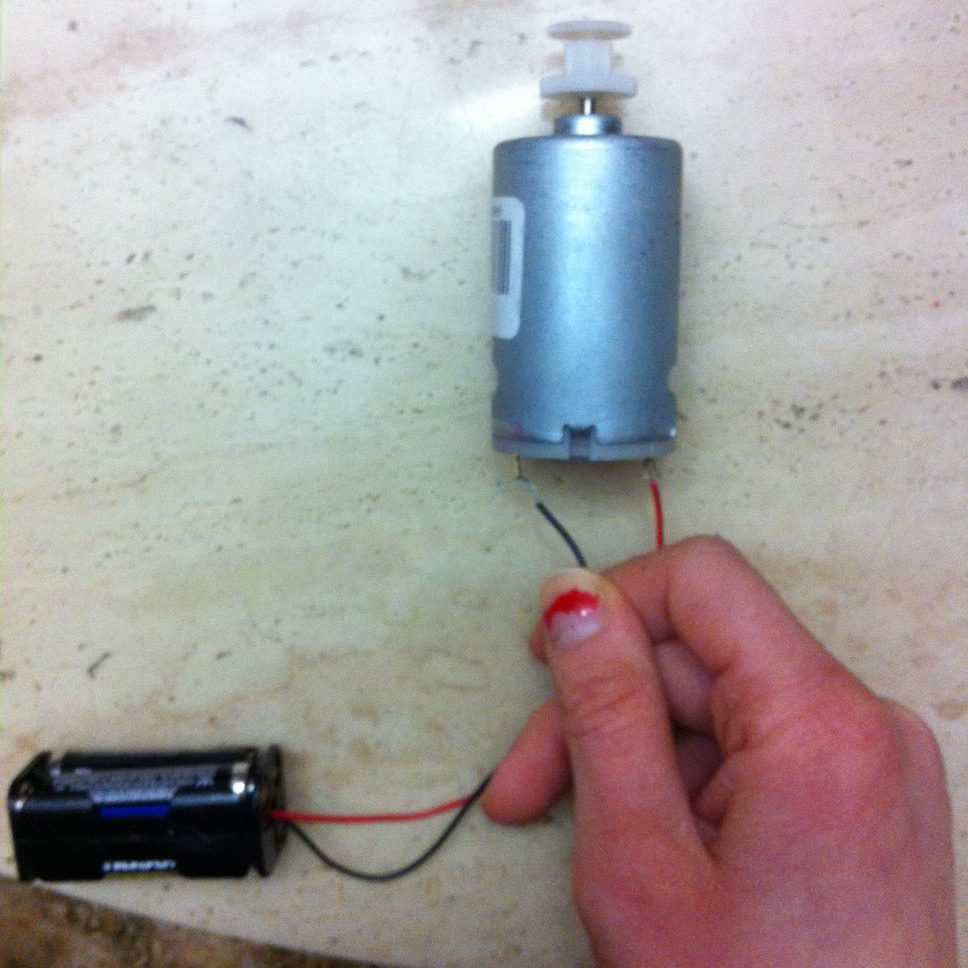
Students will break into groups of three and pick one of their designs to build. They will use various materials and working motors, while exploring distinctive art techniques of assemblage, material and form association, and detail. As well, they will explore various technologies and scientific terms such as circuits, weight, momentum, RPM and voltage. For more inspiration, the educator shows the work of Michael Demeng, who creates motorized toys using the assemblage technique, and Zimoun, who uses motors in his installations. In addition, students will be shown two prototypes of already-built rides
Art Objectives
Vocabulary
Art Vocabulary
Science Vocabulary
Materials
DC motors, battery packs, batteries, gears, cardboard, popsicle sticks, glue guns, scissors, Styrofoam, pipe cleaners, Ziploc bags and any other material you can find!
Competencies
Visual Arts
Cross Curricular
Motivation & Response Questions
Questions about own art
How will you choose your material? What materials do you think would work best with your design? What are some of the steps you have taken to reach your final product? What were some of the difficulties you had when using the motors? How did you solve these problems?
Questions about peers’ art, Demeng, and Zimoun
How are these works similar or different from your own? What materials or steps did they take that may benefit your design? How is the motor used in the design? Have you discovered alternative techniques to the ones I have shown you? What do you think about these works? Are they exciting, scary, calm etc. Why or why not? Are they exciting, scary, calm, etc.? Why or Why not?
Step 3: Paint your Ride
Rationale
Students will paint and embellish their amusement park rides while exploring the terms and techniques of color meaning, color mixing and revisiting the techniques’ texture and detail using a different medium. For inspiration, the work of Banksy, Nowak, Deng and Zimoun will be revisited to study how they used color and embellishments in their work.
Art Objectives
Vocabulary
Materials
Acrylic paint, paint brushes, water containers, beads, plasticine, string, and other
Competencies
Visual Arts
Cross Curricular
Motivation & Response Questions
Questions about own art
What colors did you use and why? How do they connect to your ride? What are the colors supposed to make the rider feel? How does this enhance the experience?How does color support your theme or concept?
Questions about peer art and contemporary artists (Demeng, Zimoun and others):
What types of colors have these artists used? Do you think they have used these colors for a specific reason? How do the colors make you feel? How would the work change if the colors were different? Do you prefer one work over the other? Why or why not?
Step 4: Present your ride
For the final activity, each team will be asked to present and pitch their idea to the classroom. The remaining students in the room will take on the role of IMAQUEST adjudicators. At the end, the team who received the most votes from the class wins the contract with IMAQUEST! Students should be as imaginative as they wish in presenting and in their roles as IMAQUEST adjudicators. Playing counts here! This is the only part of the unit where they will have totally open direction! HAVE FUN!
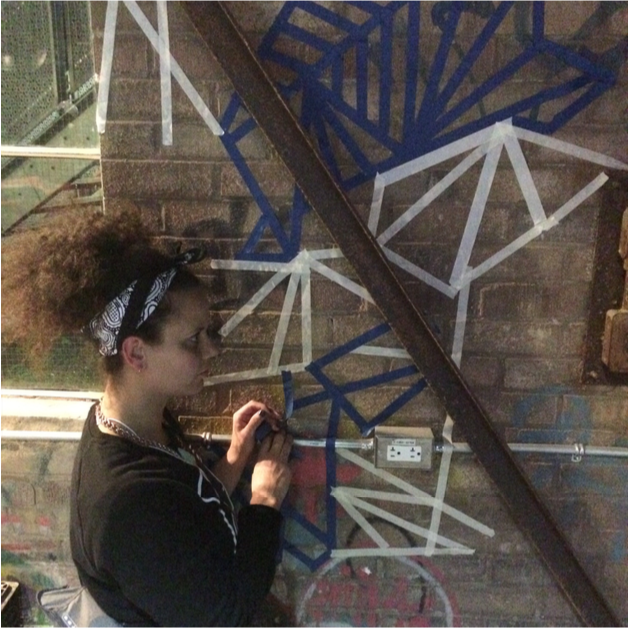
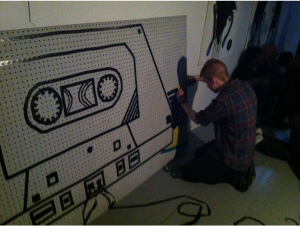
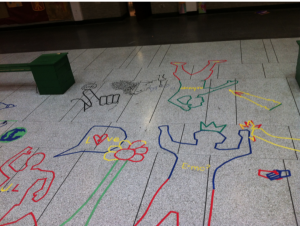
“Mixed Tape” Ephemeral installation and facilitation of tape art at Emergence Symposium, Toronto, November 2015 (Photo: M. Proietti)
Christina Marie Phelps
5th year, Art Education Specialization
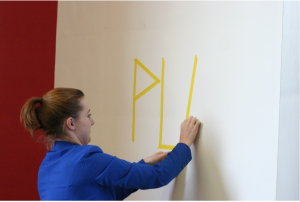
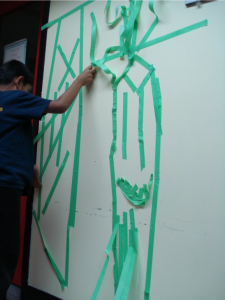
Tape Art: Getting into Sticky Situations
tape on walls and other objects
What if you were asked to draw a picture without the use of a pencil, crayon or ink? What if you were discouraged from making your marks on a traditional piece of paper or canvas support? These are the types of questions I ask of my various learning populations when encountering the medium of tape art. Tape art is a drawing medium and an artful “ playshop” activity that I like to use as an icebreaker and introductory activity with various teaching populations. This ephemeral and site-specific improvisational art form is an excellent entry point into the world of street art practices, murals, and public artworks. I have used the medium of tape art as a teaching tool for the past four years in public and private school settings, university workshops, arts festivals, symposiums, and with church and community groups. I’ve found that tape art workshops can bring incredible results, because of the playful medium being used.
Inspiration: I first came across an artist who uses tape art, while developing a community art project for the “ Artful Play” unit in my second year of studies at Concordia University. Buff Diss, the Australian graffiti writer-turned-tape artist, had explored the medium in the same way he had with aerosol paint. Buff Diss’s tape art installations can be found on train cars, busy market streets, in abandoned buildings, and on sides of walls, both in interior and exterior spaces. After seeing how Diss works the possibilities of the medium, I was hooked. Low adhesive tape like a green or blue painter’s tape seems to be the perfect kind of tape since it allows participants to tear, snip, and place their tape-drawn creations quickly and easily. I will often give learning groups the option to create solo works or to pair up and work collectively on a themed creation. The latter situation has lead to some interesting conversations regarding co-operation, negotiating space, and creative problem solving. The ephemeral nature of tape—it can be peeled off, or else it eventually wears away—allows the artist to create and experiment in environments that are normally left quite blank. Like chalk on a playground, tape is a way for people to temporarily reclaim the public space and make their mark for others to see and interact with.
Tape-Testing: Besides typical painter’s tape, I have worked with colored electrical tape on surfaces that have a dull finish such as sidewalks, streets, brick walls, and table-tops that have protective coating. The main differences between this tape and painter’s masking tape are the thickness, the fact that it has to be cut with scissors or a knife, and the limit that it should not be used on a painted surface. Electrical tape has a tendency to pull off the paint from walls, or destroy certain finishes on floors and table-tops. It’s always best to test the tape prior to the playshop and get permission from the building manager. The new decorative paper tapes and washi tapes are deemed safe to use on walls and floors but paper tapes tear quite easily if walked on. Also, washi tape can be quite costly and there are limited amounts on a roll.
Tear Down: When working in a shared common space, it’s important to leave the space as found. That means the tape art installations don’t remain for longer than the duration of the playshop. I actually have the tear-down segment become a major part of the activity. After presentation and discussion of the artworks created, I challenge my groups to remove and collect their tape into a giant tape ball, that they are then encouraged to play with afterwards. This is especially wonderful when orchestrating the activity in children’s groups. Once their artworks have been documented, they get to make a unique tape ball which becomes a souvenir of their non-conventional drawing experience.
Resources:
Tommy Ung
2nd year, Art Education Major
Cosplay
Mixed media & digital photography
2015
Cosplaying (a term that bridges costume and play) has been my hobby for over 5 years. The whole process behind replicating an outfit from a two-dimensional work of fiction into something that can be worn is very tedious due to the broad array of skills required. There is also a lot of planning involved before the actual execution and /construction in order to produce the best results. These are samples of pictures taken in collaboration with photographers, in order to showcase my work in 2015 based onChrom from “Fire Emblem Awakening” (©Nintendo/Intelligent Systems) and the protagonist Flynn from “Shin Megami Tensei IV.” (©SEGA/Atlus)
The notion of play for me is constantly present during the creation process. I find pleasure in excelling and pushing myself to the limits to achieve the very best quality of work. I perform a wide variety of tasks by myself such as patterning, tailoring, woodworking and painting. I mostly learned my set of sewing skills through my mother who is a seamstress, and most of the other skills through material experimentation and research When the costume is completed and I finally get to wear it for a convention or a photo shoot, my body becomes the means of display and I become an essential part of the cosplay process. Wearing the costumes, to me, is really just a means to show my dedication as a fan of a work of fiction. It also eases into playful conversations with others sharing similar interests to my own.
Photographing the costume is as important as building the costume. You try to pose like the character, you try to breath life into the costume even as the shutter captures a still image. The important thing is to have fun in the process, otherwise it stops feeling like a hobby. I feel that in art, play is what intuitively leads us into creating artworks that are more honest and meaningful to us.
Special thanks to
1) Jocelyn Thibault “Belziir” for “Shin Megami Tensei Protagonist”
2) Gary Thompson for “Chrom – Fire Emblem Awakening”
**Original image of work currently unavailable**
Rosi Maria Di Meglio
3rd year, Art Education Major
Collide II
Oil on cotton canvas
24″ x 36″x 2″
2015
My work explores the space between two worlds; the push and pull of the foreground and the background. In between that push and pull is a space, a resting place that I am searching to create. I am playing with colour field and gestural abstract painting, which was popularized during the late 1940s and 1950s. Jean-Paul Riopelle’s and Mark Rothko’s use of the palette knife, and layering of colours are strong inspirations in my playing with paint. I use these techniques of layering to play with space; a space where a third-dimension within the canvas can live and imagination can run free.
**Original image of work currently unavailable**
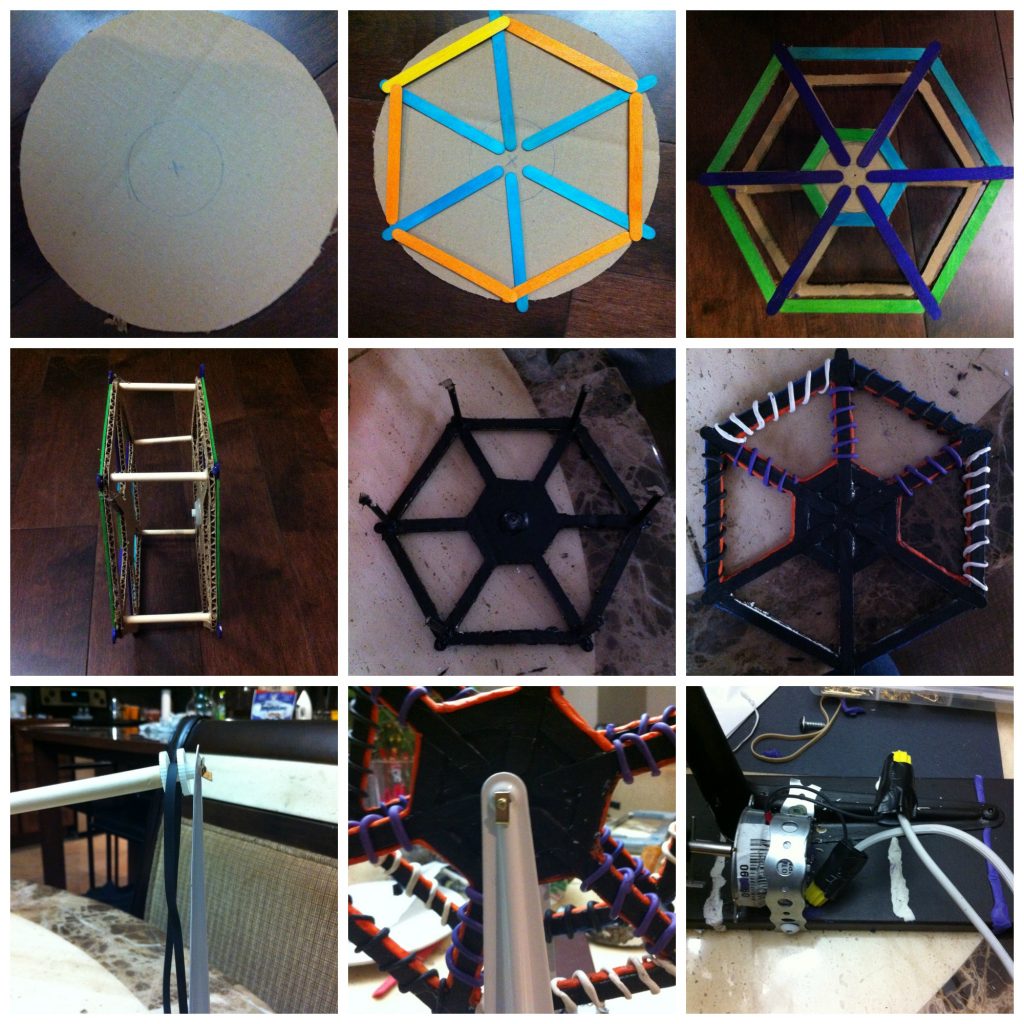
La Tour de Son Collective
Katia Arcarese, 4th year Studio Arts
Tyseka Castor, Graduate of Drawing and Painting Major
Lauren Kleiderman, 4th year Art Education Specialization
Kevin Francois Andres Teixeira, 4th year Sculpture
Cassie Wight, 4th year Studio Arts.
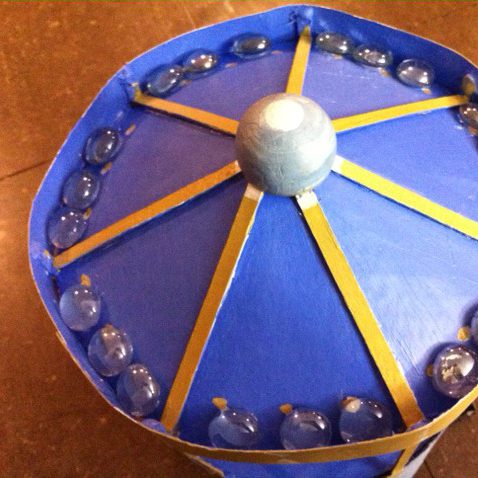
La Tour de Son
8′ x 7’x 8′
2015
Our artist collective – merging a variety of skills, insights and approaches – has created a collaborative kinetic sculpture that represents an exploration of sound, drawing, play, movement and the body in space. La tour de son is an innovative musical instrument inspired by the movement of a carousel in the playground. Using the MAX software to create a visual language, our group worked closely with a sensor to program different colours to trigger different variations of sounds. The sensor rotates in place at the center of a spinnable wheel consisting of two panels—a base panel in three colours and a top panel made of a collaborative drawing with cut-outs to reveal the colour below. Viewers may grab hold of rope handles to pivot the layers or place their hands under the moving sensor to shift the outcome; their movements trigger different colours, which in turn affect the sound emitted by the installation. Our collective artwork calls for an immediate return to play, inviting the audience to interact and engage with the structure, alone or with a partner. The idea is to encourage movement, dance, play and generate an expanded sensorial experience bringing together the divide between performer and spectator.
La tour de son will be a part of the final exhibition of the Art Matters Festival that will occur at Never Apart Gallery on Saturday, March 26th, 2016 from 7pm-11pm.
**Original image of work currently unavailable**
Paméla Desrosiers
Éducation artistique, Spécialisation (5ème année)
Traces
Huile sur toile
24″ x 36″ (5 toiles)
2015
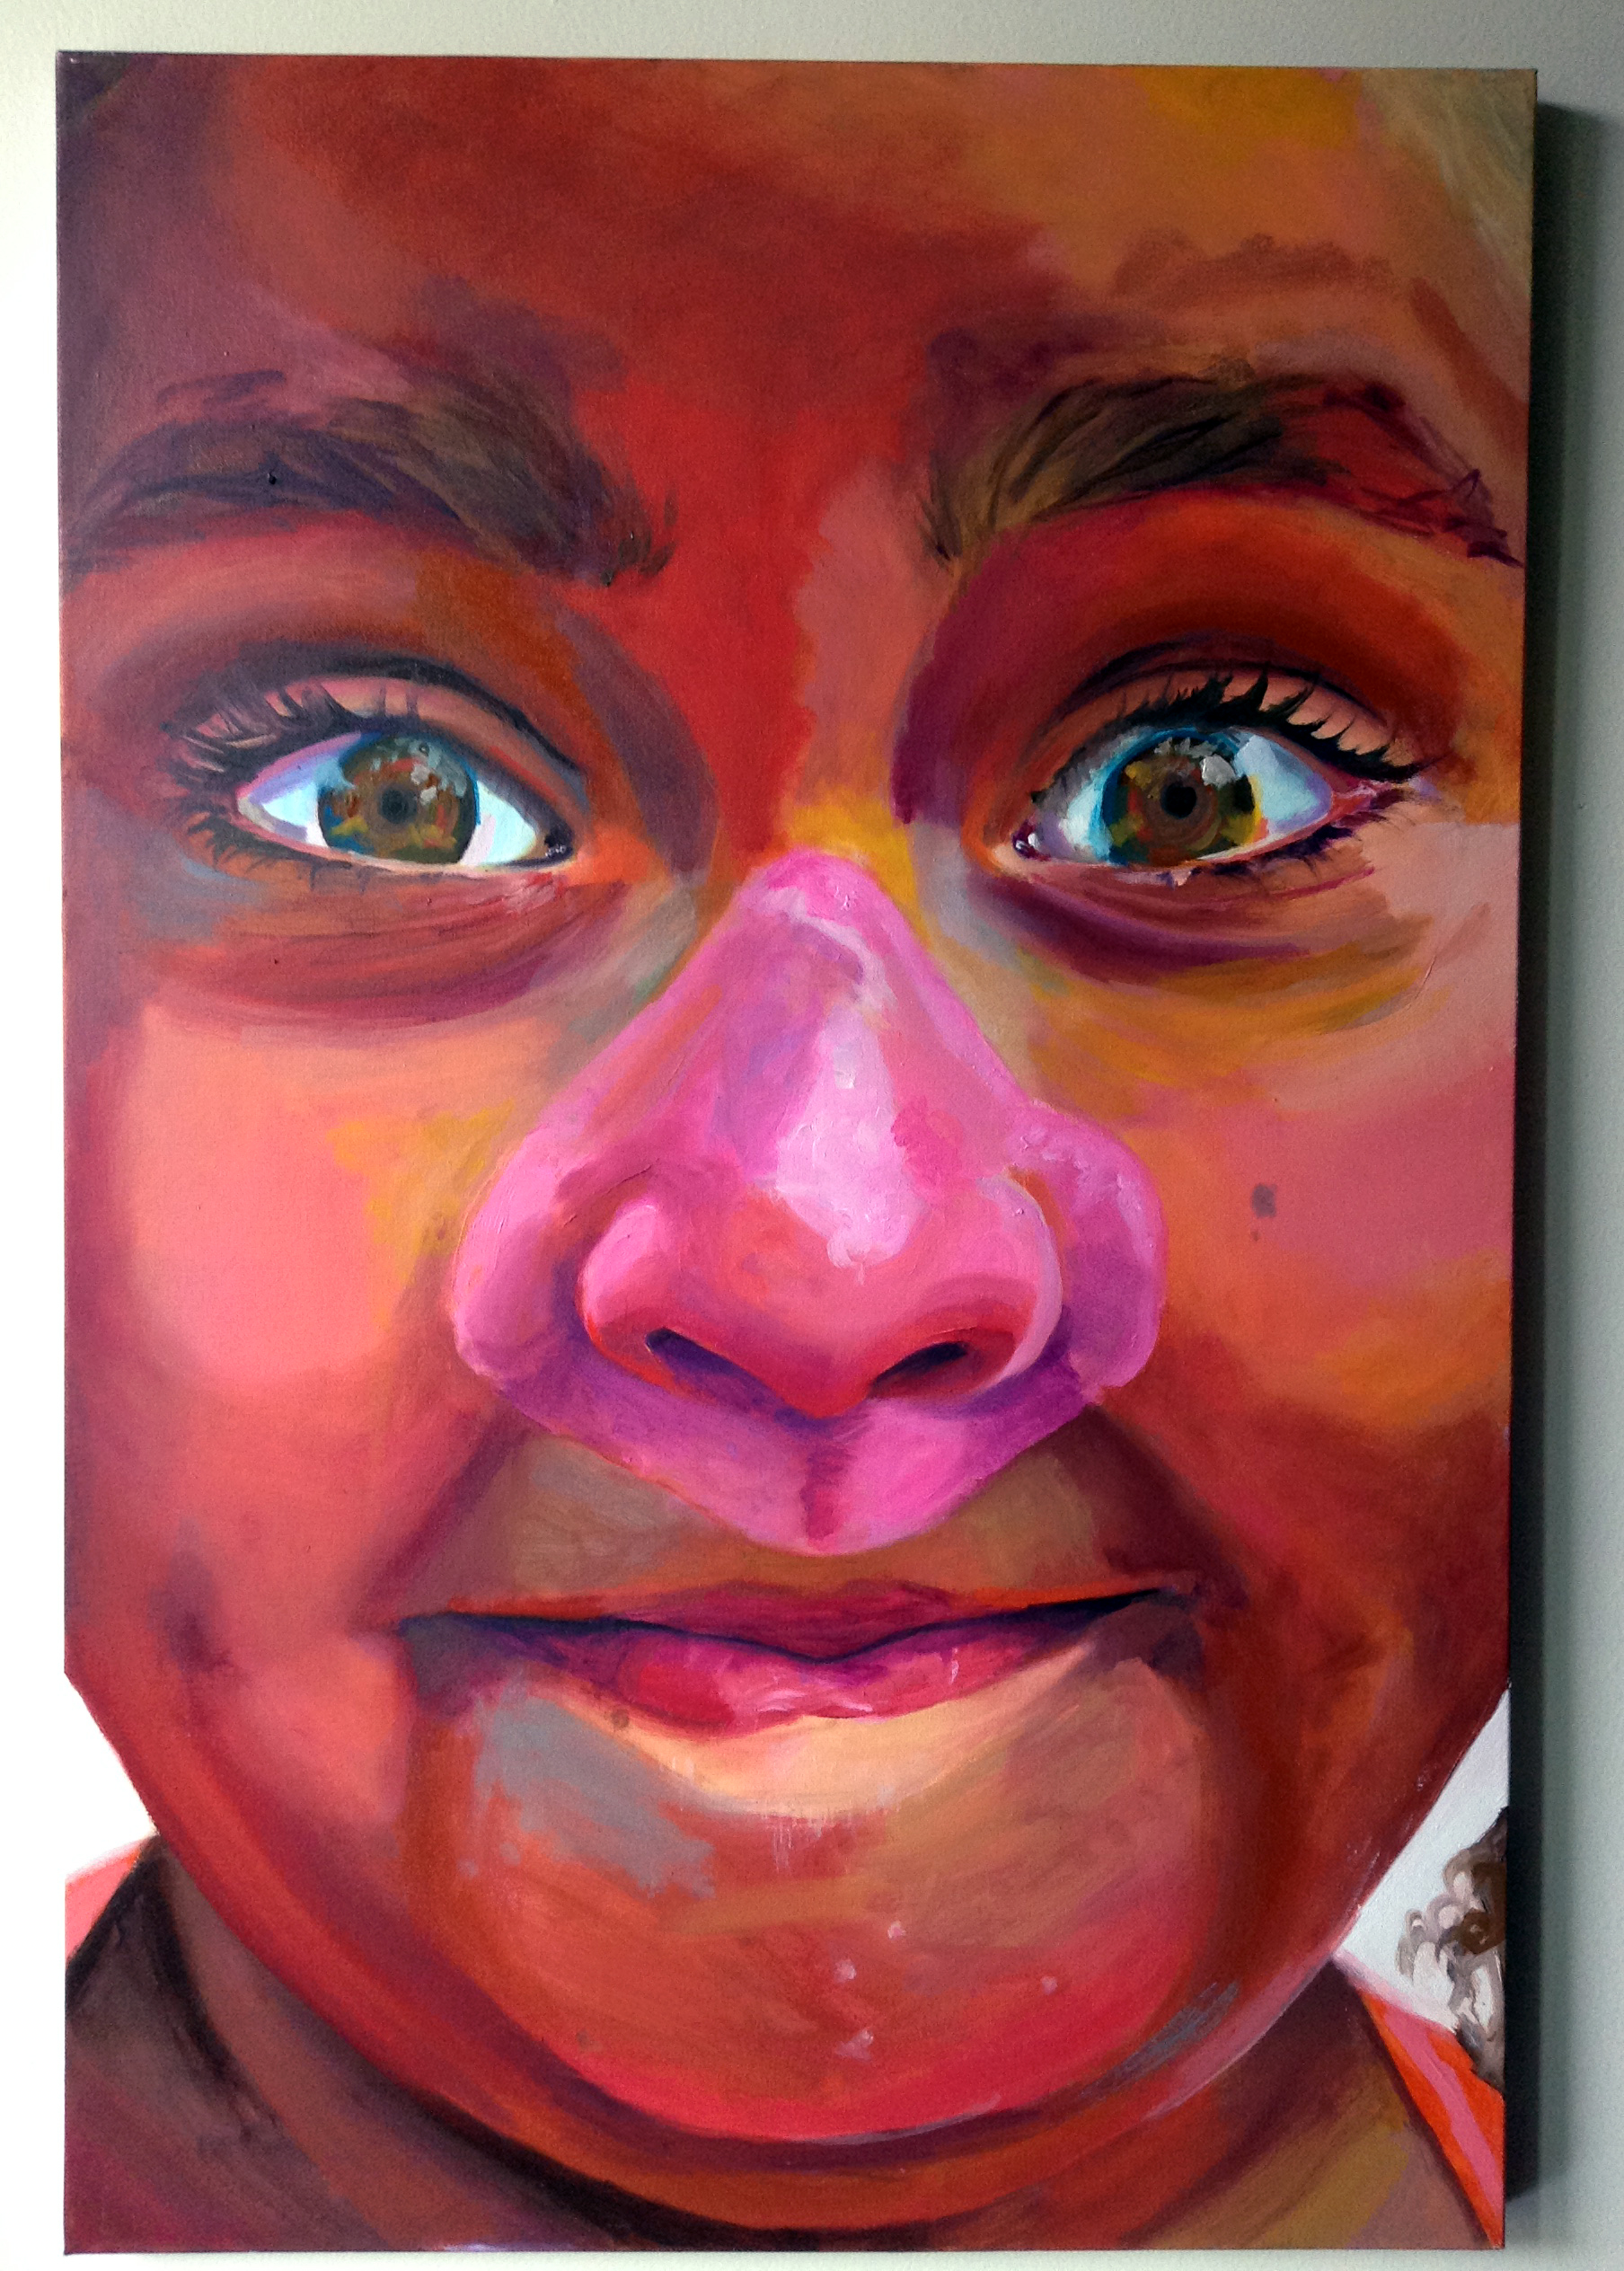
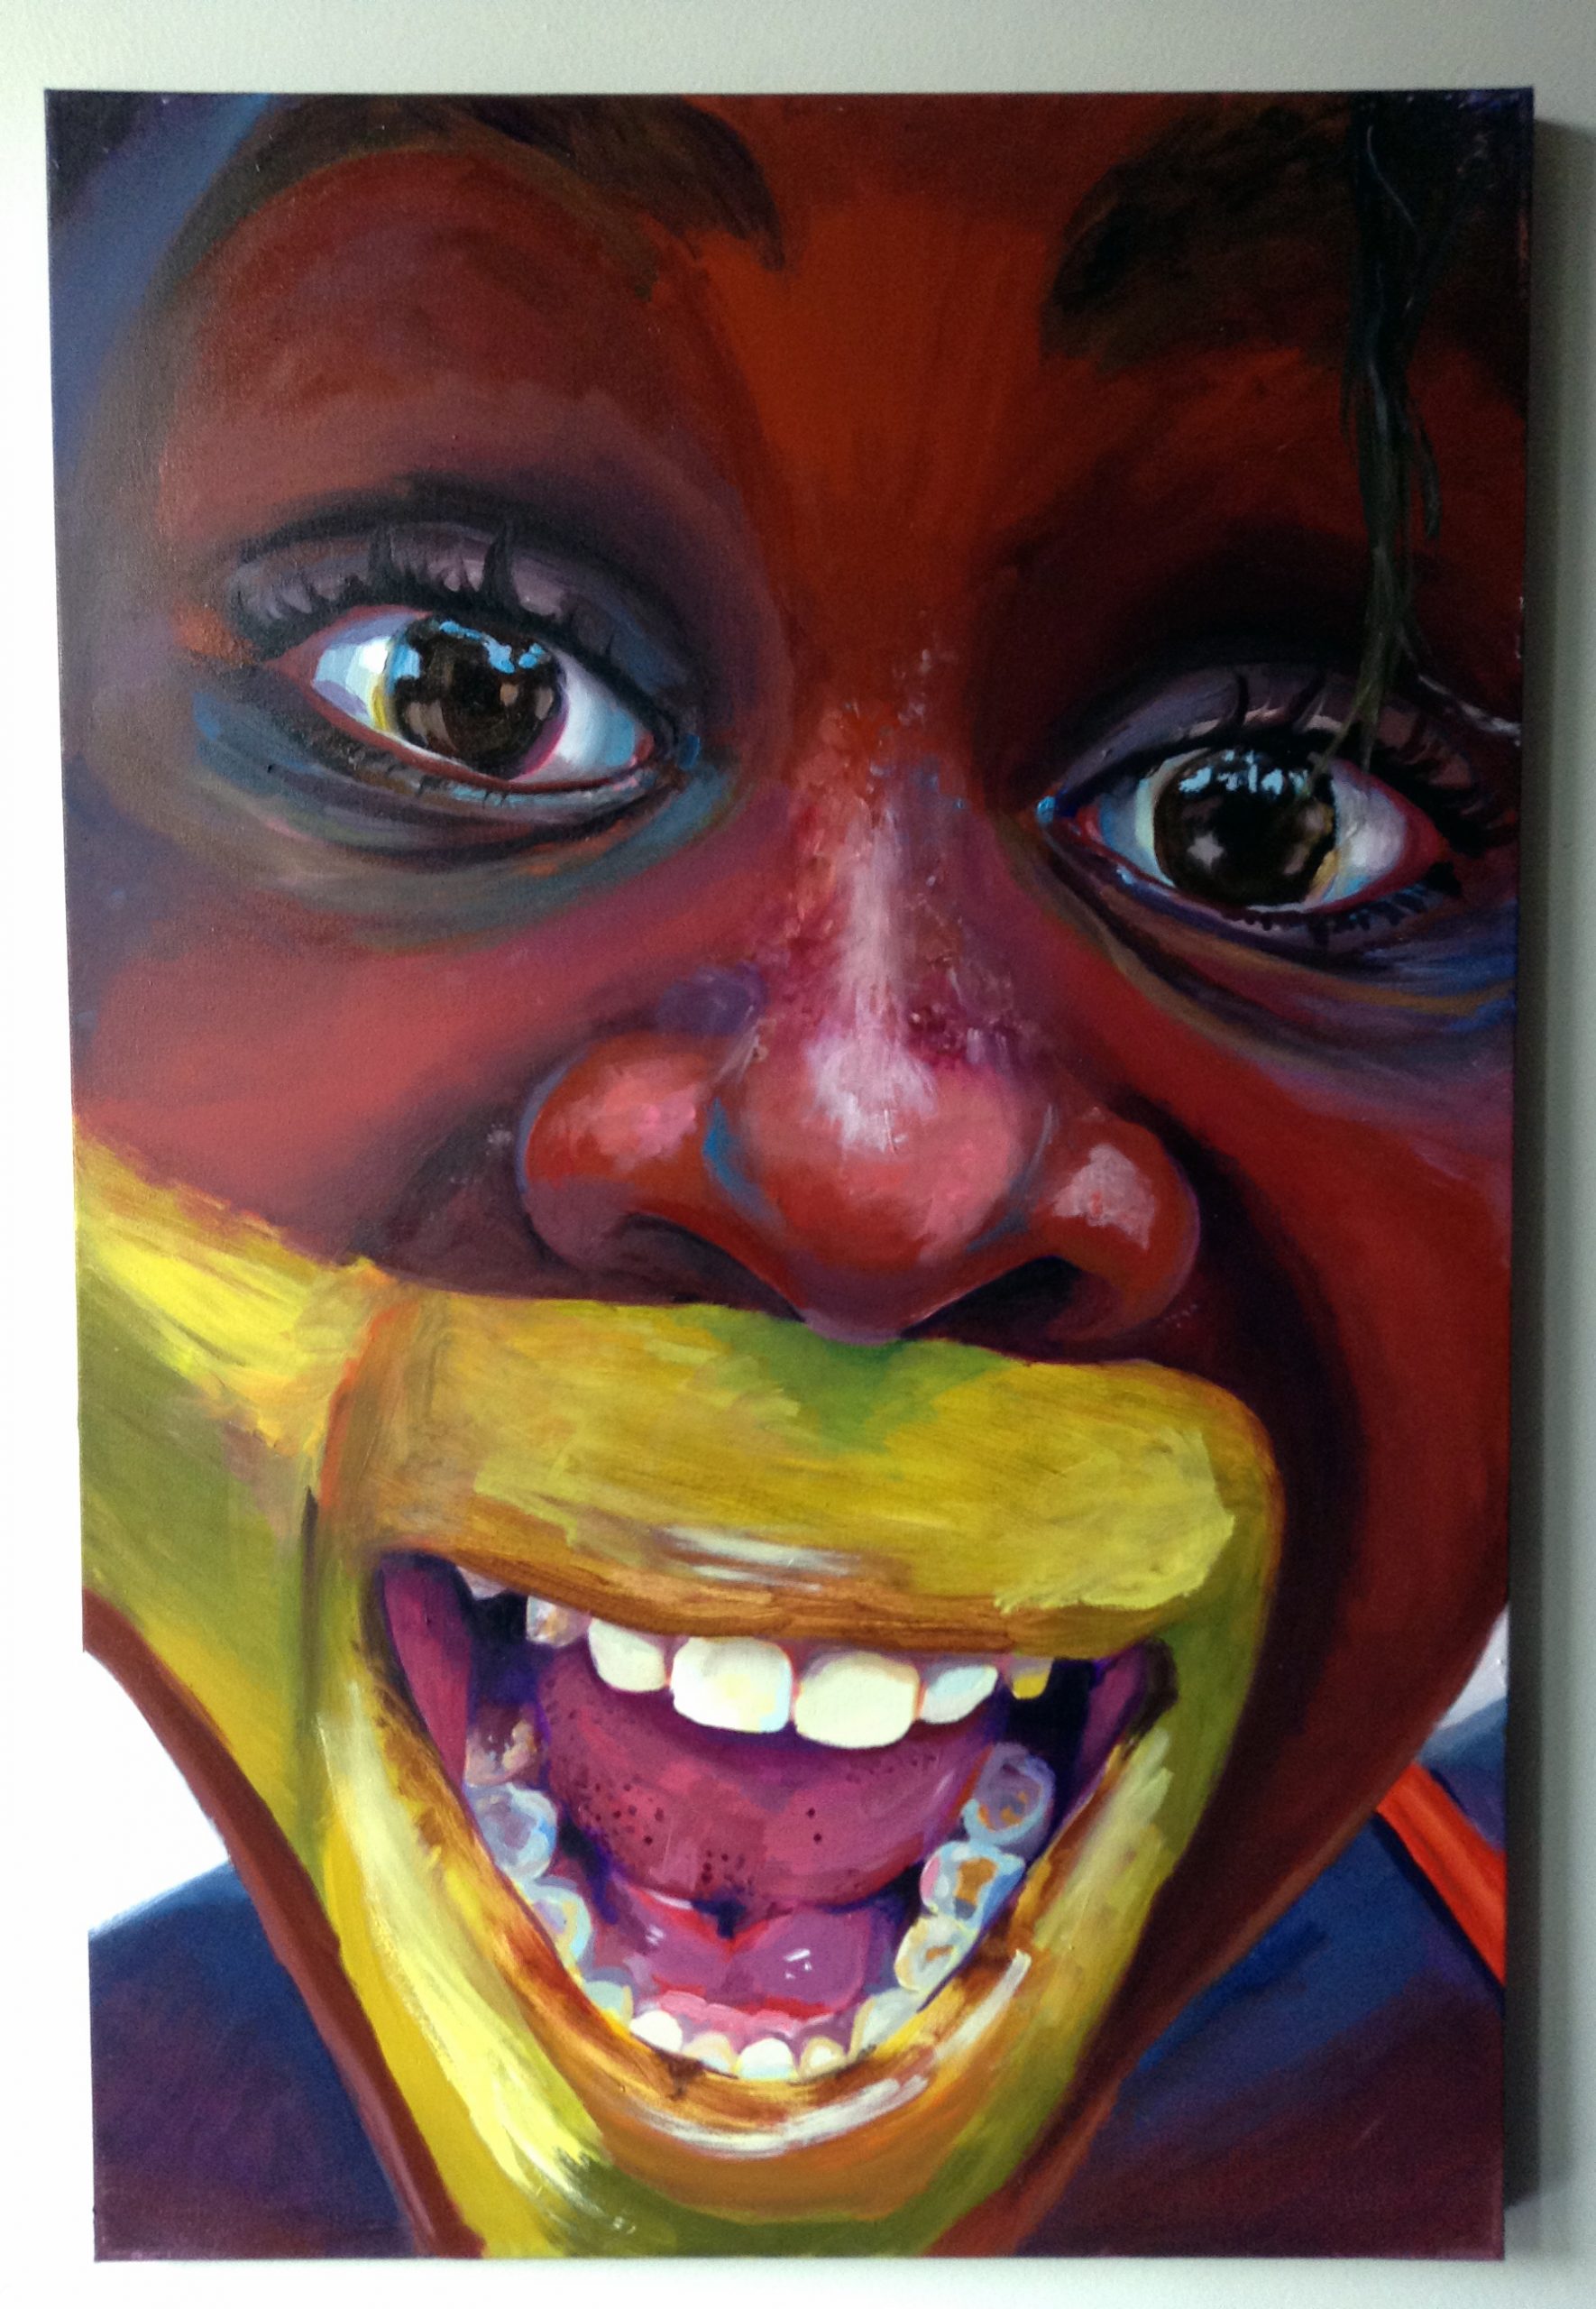
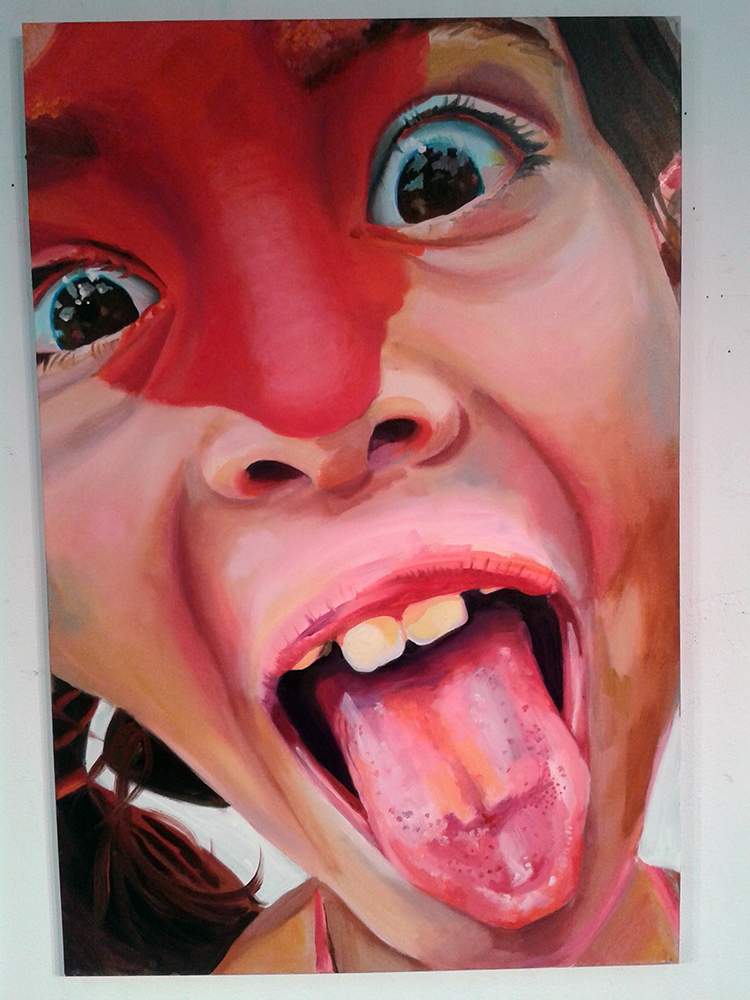
Traces est une exploration picturale. Ma fille, qui est métissée, et ses amis m’ont permis de raffiner ma technique du portrait en me donnant l’occasion de jouer à trouver la couleur de fond de chaque tonalité de leur peau qui va du blanc caucasien au noir tchadien.
Ce fut un voyage au pays de l’innocence et du jeu. J’ai d’abord peint sur les visages des enfants et je les ai ensuite photographiés dans un milieu où ils sont naturellement heureux: le parc. Je les ai invités à faire une grimace, leur plus belle grimace, à l’univers tout entier.
Sans masque, sans peur, sans retenue… que du plaisir, là, maintenant, de tout leur être.
Cassandra Richard Trudel
4th Year, Art Education Major
Perceptions
Acrylic paint on canvas
4′ x 5.5′
2015
Perceptions is a painting depicting my interpretation of the conscious and the subconscious minds. Vibrant colours make this painting playful, the black contour brings mystery to the subject. My artwork has been influenced by my teaching practice in the community to the extent that I now use pattern more often in my own work. Patterns are a useful tool in my workshops. I find repetitive shapes, and activities such as zentangles, an accessible way to make art for those who think they cannot draw or paint. The use of motifs and narratives are recurrent themes in my art. In this painting, motifs are a way to represent different thoughts and emotions communicated by one’s subconscious. With Perceptions, I hope to create an opportunity for viewers to be challenged by my work. My aim is to have the audience engage with my piece as a problem to solve through their own interpretations of each component.
Take a moment to look at every component, and use your imagination to create your own playful narrative.
**Original image of work currently unavailable**
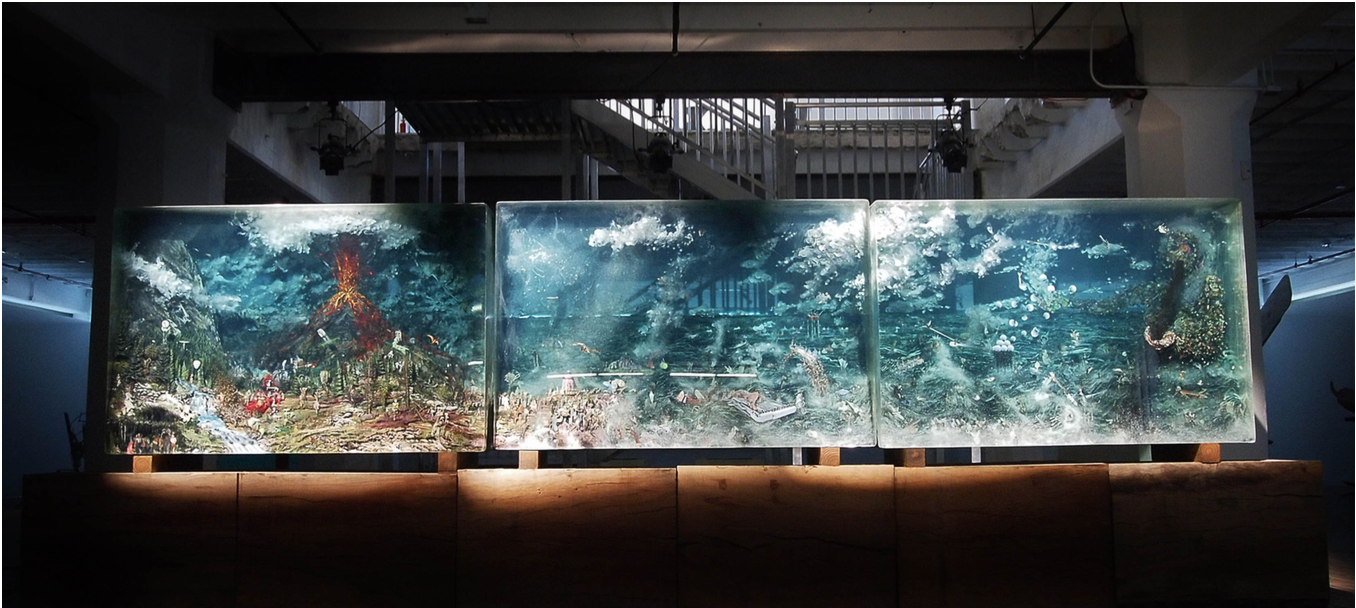
(Fig.1) Triptych, by Dustin Yellin, Retrieved from http://beautifulnow.is/bnow/soul-under-glass- now
Véronique Chassé
1st year, Art Education major
Material Culture: Concepts of Material Culture Studies and Collecting in Community Art Practice
According to the Webster’ New World Dictionary, to collect is “to gather together and assemble” (Agnes, 1999, p.287). In other words, accumulating things we encounter either by chance or through research and bringing them together somehow. We could see the act of collecting as mimicking the way artists use physical and intangible materials from their environment to construct original creations. As artists go about their lives–seeing, hearing, smelling, tasting, touching, doing and feeling things–they are gathering material. “There is a dialectical, recursive interaction among persons and things that influences how we think, act and construct our sense of self ” (Graham, 2011, p.64). In considering the art practice in this way, community art participants, regardless of their background or experience, are well-equipped collectors and artists. Whether we are conscious of it or not, none of our decisions are random. We can observe the way artists gather and select the materials they use and how they choose to assemble them in meaningful creative ways. In a community art education setting, anyone can find ways to play with their collections through art making as long as they have a nurturing and open art space. Through the constant stream of experiences we all have, artists build their collection by acquiring information about the materials in their environment. What artists choose to register in their visual vocabulary will differ just as collections will vary between collectors. The material an artist or a collector selects depends on what they deem to be interesting, unique and precious. Anything can be collected just as anything can be an inspiration, subject or medium in art making. We could also say that every material used in art making comes from the environment of the artist. Artists are always referencing materials they have been exposed to in some way. They might not always be immediately conscious of their choices but in questioning their decisions, they might “discover and reveal the culture in which they live (…) [and] reveal themselves as cultural beings, participants, and embodiments of culture” (Marshall, 2002, p.282). Our understanding of any given material is the result of its relationship with other materials and ourselves. We find certain things more interesting than others and choose to focus our attention on them. Why does a seashell collector decide to keep seashells and not pebbles? Why does a landscape painter choose to illustrate landscapes rather than people? We choose to focus on certain materials rather than others not because of their inherent value but because of values we discover in them through work, play, or other kinds of relations we make with them.
In his Ted talk, A Journey Through the Mind of an Artist, Dustin Yellin describes his use of boxes for creating relationships and stories between everyday found objects (Yellin, 2014). Yellin creates intricate three-dimensional works in which he combines all sorts of objects, symbols and images (Fig.1). Each element conveys a meaning because of its relationship to other elements. His work could be seen as collections of cultural references, which borrow material from the fields of politics, science, mythology, ecology, and so on.
In constructing works of art or collections, we attempt to bring order and communicate the relationships between collected materials, although what we create will consequently vary tremendously due to our own set of references and experiences (Graham, 2011, p.64). Artists make sense of their gathered material by integrating them in ways that are meaningful to them. Once an artist has accumulated material they must sort through it, understand what they are working with, figure out how they relate to each other and interpret them. It is by assembling things that artists develop their creativity and explore meta-statements. For example, Jean Shin’s installation, Alterations (Fig.2) combines scraps of shortened pants, a material that holds little value in and of itself, in a way that addresses several bigger issues. The way she chose to assemble her material is significant in communicating her message. In positioning the pant scraps upright and side-by-side, she created a cityscape which references members of the population. The variation in height is also symbolic of the diversity of height in the particular Chinese population responsible for many of the fashion industry’s manufacturing (Shin, 1999). While Shin reflected on the minor details and interpretations of her piece, other artists might not consciously aim to convey such complex messages. In a community teaching environment, participants might not question their choices every step of the way.
However, the way they decide to construct their work holds a wealth of meaning and information that can be investigated further. None of their decisions are truly random. Instead, open-ended forms of engagement with the various materials that move us can lead to great discovery. Art works and collections “can be a way to order or come to terms with the strangeness, complexities, and randomness of the world” (Graham, 2011, p.67). They give new meaning and identity to the materials being used; the physical material as well as the intangible, conceptual or symbolic material.
Finally, by drawing parallels between the act of collecting and art making, we might begin to acknowledge and welcome diverse ways of art making and of being an artist. In order to be considered an artist, one does not necessarily need to produce a wealth of works or to consciously research material or to construct things that are intended as art works. What if we extend the definition, borrowing from the artist’s and the collector’s capacity to pay careful attention to materials?
Art making, then, engages us all in our everyday lives whether we are aware of it or not. “A picture, a book, a piece of music, can remind [us] of feelings, thinkings, [we] did not even know [we] had forgot. (…) The process of art is a series of jolts, or perhaps (…) volts, for art is an extraordinary faithful transmitter” (Winterson, 1995, p.13). By studying material culture, we are focusing on « the physical, material nature of objects and the human practices that surround them » (Graham, 2011, p.64). Everyone’s relationship with their environment, culture, history is unique, but what we all have in common is a relationship of some sort to material culture. We are constantly gathering and assembling materials. In community art practices, taking a collector’s approach to art making, and allowing a playful interaction with their gathered materials, might help empower participants and make art making a more accessible practice.
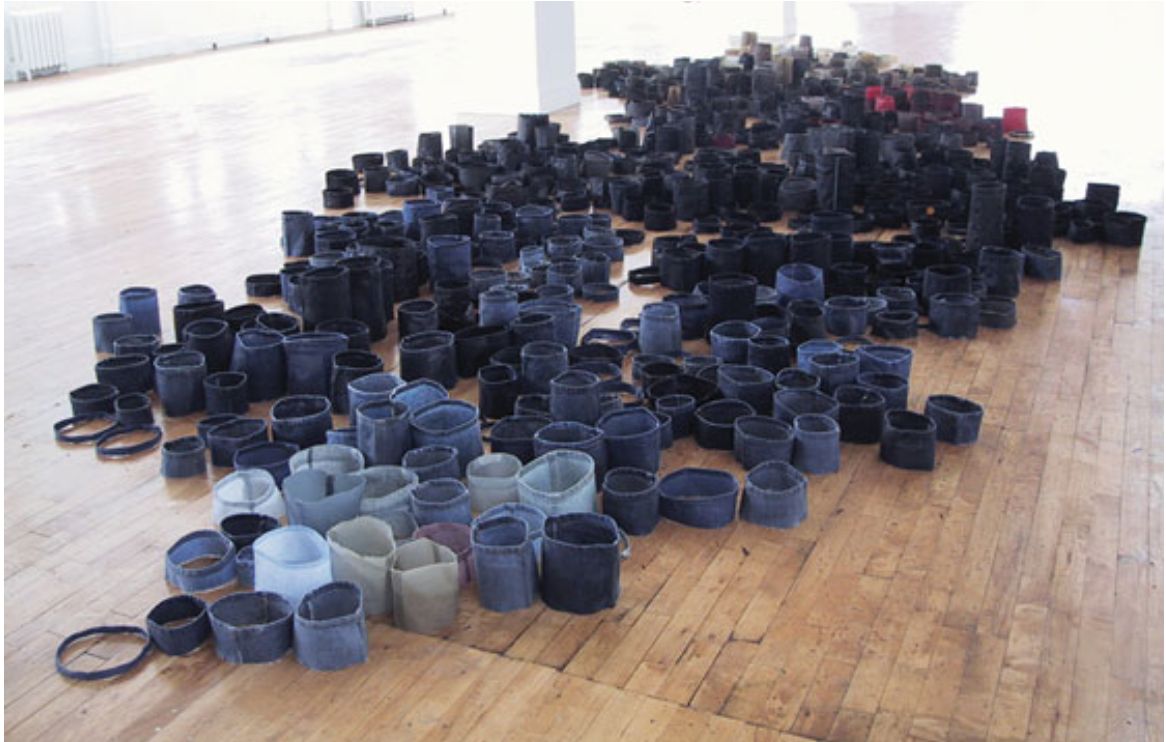
(Fig. 2) Alterations, by Jean Shin. Retrieved from http://jeanshin.com/alterations.htm#
References :
Graham, M.A. (2011). The Art of Collecting, Material Culture, and Place-Based Education. In D. Blandy & P. Bolin (Eds.) Matter Matters : Material Culture and Art Education. (pp.63-73) Reston VA : National Art Education Association.
Marshall, J. (2002). Exploring Culture and Identity Through Artifacts : Three Lessons Derived from Contemporary Art Practice. In Y. Gaudelius & P. Speirs (Eds.). Contemporary Issues in Art Education. Upper Saddle River, NJ : Prentice Hall
Shin, J. (1999). Alterations. Jean Shin [website]. Retrieved from http://jeanshin.com/alterations.htm
Agnes, M. (1999). Webster’s New World College Dictionary. (p.287). Macmillan USA.
Winterson, J. (1995). Art Objects :Essays on Ecstasy and Effrontery. New York : Vintage Books, pp.3-21.
Yellin, D. (October 2014). Dustin Yellin : A Journey Through the Mind of an Artist. Ted : Ideas Worth Spreading. https://www.ted.com/talks/dustin_yellin_a_journey_through_the_mind_of_an_artist#t-250300
3rd year, Art Education major
Manifesto
(the manifesto itself slipped through the digital cracks, we will add it soon)
Sara Hanley is a graduating student from the Art Education program. She is also a dancer, choreographer, teacher and cultural mediator. The following manifesto was written for a unit plan titled The Art of Noticing which fosters the use of intuition, non-linear ways of thinking and the whole body’s intelligence as tools for artistic research. In this context, playfulness relates to unlocking tensions in the body and in the mind to allow flow to circulate and foster creativity. It is also a way to sense, reflect and imagine. It is also a way to reflect, sense and imagine.
Copyright © 2025 InArte Journal. All rights reserved
.full.1443319.jpg)