Lauren Costello, Maya Lalonde, Stephanie Mungiovi, Shauna Rak & Myriam Vincent
2nd Year, Art Education Major
The pinhole camera project
In our project, it was important that the individual artistic vision was not compromised within the group project. In fact, the activity was designed so that the individual serves the group interests, and vice versa.
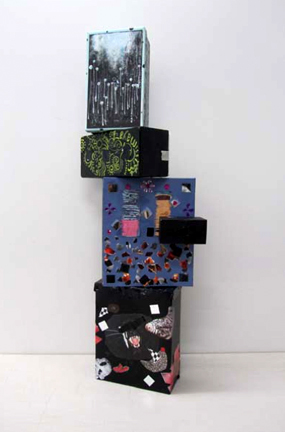
Our pinhole camera project is a collaborative installation that combines sculpture and photography in a functioning camera and art object. Each artist created and contributed a unique pinhole camera in to the installation, representing her individual voice, which with four others can create one vision. The project addresses the collective’s social and community issues as well as personal development.
The collaborative aspect of this project supports two social competencies of the MEQ (Ministère de L’Éducation du Quebec): to find a place in a group and to work with others. For these competencies, the pinhole project is most suitable for adolescent learners. The collaborative process helps learners to understand differences of opinions and to achieve consensus.
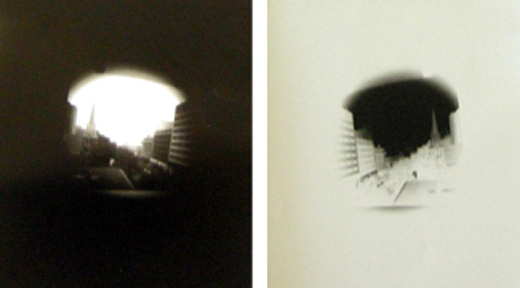
For our prototype of the project, we chose to photograph the view of Montreal from the photography department at Concordia University. We choose this location because it is common ground we share as students.
Background to the project
A pinhole camera is a lensless camera, that works by focusing light through a tiny aperture and projecting it onto the back interior surface of the inner chamber of the form. Any lightproof container can be fashioned into a pinhole camera, and while coffee cans and shoeboxes are among the most common, artists have used refrigerators, stuffed animals, hollowed out books, and just about anything else you can imagine as the basis for a camera. The image that is projected onto the back inner surface of the container can be recorded on film or on photographic paper, which becomes a negative of the world outside the camera, and a means to capture a unique vision of the world.
Pinhole cameras can be made for almost no cost and easily operated by photographers of all ages, even if it can take some tricky calculations to get a good exposure. Its unique look makes the pinhole the camera of choice for many artists (Bignell, n.d.).
Reasons for camera option
The pinhole camera as an object and a medium reflects the artistic interests and personal characteristics of the individuals in the group. The composite aspect of this project provides learners with the freedom to experiment with multiple cameras. The construction of the pinhole camera can also lead the group to explore other mediums such as collage and sculpture. These options present the opportunity for learners to explore identity and the potential for pinhole camera projects in the classroom.
Reflections on project
Lauren:
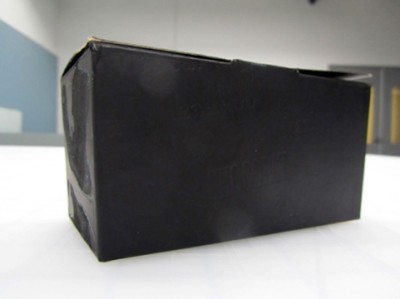
The pinhole camera is a memory maker. My pinhole camera is made with a box of chocolates from France that my boyfriend gave me. Every time I eat this chocolate, I am reminded of the love we share and the memories we created. Now that the chocolates are gone, what is left is a box of memories.
For this project, this box was transformed into a new memory maker: a pinhole camera that can capture intimate moments between us and other loved ones. I wanted to keep the outside of this pinhole camera simple, since the interior is important to me. As a result, the exterior of the camera was painted black. The embossed motif, of the word “chocolate” written in different languages, reflects my multicultural personality, and remains visible underneath the paint.
Maya:
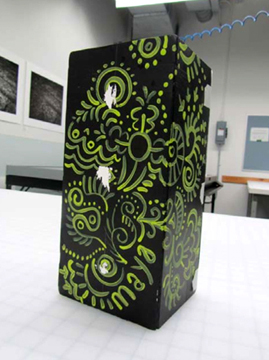
Although I could have used a readymade box as the base for my pinhole camera, I chose to build the camera body. I wanted to have the freedom of working with my hands and use basic materials to build a my concept rather than find it through ready made materials.
Making the camera allowed me to experiment with different structures and designs. The patterns I painted onto the camera, using my favorite color green, represents my artistic nature. The pinhole camera also contains three compartments with three holes. These holes act as a metaphor for my various perspectives on life.
Stephanie:
My pinhole camera, like the others, was designed to represent the way in which I perceive myself. Embellished on two sides, the camera was intended to show the swift movement between thought and emotion. I decided to design the camera using both bright and dark colours as part of its concept. A philosophy class I took in Cegep inspirited this idea, where I realised the the world could be a dark place. This realization shocked me, since I often focused on the bright side of every situation. Although the vibrant side of my character remains a part of me, the balance between happiness and unhappiness has become more predominant.
Shauna:
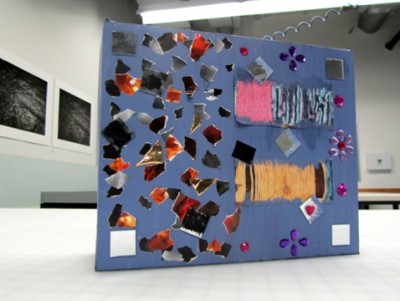
My pinhole camera is a reflection of my style and interests in art. The structure of the camera was initially painted black to reflect my attitude and attraction towards dark and mysterious objects. The next step was to cover the black surface using my preferred medium of exploration: collage. I chose collage because I enjoy manipulating different materials, mediums and textures in my work.
I am not afraid to take risks, which is why I posted images of animals that are known to be dangerous (such as panthers and snakes). I also added mirrors and the color red to give my pinhole camera an edge. These aesthetic decisions describe my impulsive, and less conforming styles in art. Although there are many aspects of myself illustrated on my pinhole camera, there are still many that remain a mystery.

Myriam:
The shoebox, being the most well known object used for pinhole photography, seemed to be the most obvious choice to use to create my camera. The simplicity of the medium provided a greater space for surface artwork. The art embellishing my box represents the opportunity to capture one of many visions in a photograph. To ensure precise edges of this photograph, the hole of the camera was made through a piece of metal sheet (Bignell, n.d.). The colors surrounding the hole represent the softer, feminine side of my personality, while the black reflects my style and preferences. The technical efforts I put into the creation of my pinhole expresses the hard working side of my personality.

Calculations and technicalities
As part of the photography process, we used the pinhole gallery website (Bignell, n.d.) to calculate the best exposure time for each camera. Myriam, for example, took a formulaic approach to calculating the exposure times of her pinhole camera. Using the depth to hole ratio provided on the website, she estimated the relationship between the exposure, depth and hole size of her camera. Myriam’s results conclude that using ratio calculations will provide a positive outcome.
Results
Size of camera 4 inches deep
Optimal hole on website 0.5 mm
Actual hole 1 mm
Estimated f/stop 250
Estimated exposure time on website 2 minutes
Actual exposure time 3 minutes
Maya’s method for calculating exposure time on the other hand, was more experimental. Since her pinhole camera is divided into three compartments, each with its own different sized hole, the calculations for exposure times were unpredictable. At first, she decided to expose all three cameras holes for the same amount of time. However, this option posed difficulties for accurate exposure calculations. As an alternative, Maya experimented with different lengths of exposure, and found that one ‘hole’ was more successful in creating images than the other two.
For both of these examples, we compared and experimented with our results as a method to adjust exposure times for the other cameras. Some photographs were successful in the first attempt, while others required more testing. After two or three takes, everybody produced a decent photograph. Coming together as a group for a second time, we decided to make a series of new exposure tests. We concluded that the morning conditions, as opposed to the previous evening conditions, were more optimal to obtain a consistent picture.
Based on the aesthetics of our photos, we felt that our positive photographs were more successful than the negatives. As a result, our final presentation consisted of our camera sculpture grouped with the best image.
Reflections on team work
In terms of decision-making and conflict resolution, as a group we opted for consensus. We wanted each member to be fully involved in the process of the project. We were inspired by Lowe’s article on community art, in which the author states “collective decision making is fundamental to the community-building process. Most artists use a loose model of consensus that allows participants to feel ownership and to be invested in the work” (Lowe, 2001). This particular way of working made us feel involved, engaged and willing to work for the realization of the project. It also created a relaxed and fun atmosphere, around which we learned to appreciate the qualities of each other.
Connecting theory to practice
In our project, it was important that the individual artistic vision was not compromised within the group project. In fact, the activity was designed so that the individual serves the group interests, and vice versa.
As expressed in Congdon, Stewart, and White’s (2001) article “Mapping Identity for Curriculum Work,” “Our individual identities are constructed through our interaction within overlapping and intersecting communities to which we belong” (p.108). As a result, our identity as individuals and a collective influenced the art making experience.
For the duration of the project, we also built what is called a community of practice (Wenger, 2006). According to the theories of Wenger, a community of practice can be defined as groups of people who share a concern or a passion for something they do and learn how to do it better as they interact regularly. He lists three characteristics that identify a community of practice:
1- Members share interests on a specific domain, value each other’s competencies and learn from the other members.
2- Members engage in a relationship and have interactions.
3- Members share stories and resources about their practice.
In this respect, the main objective for group work is to learn by sharing an interest. Group work can be a rewarding experience for improving practice and learning collectively.
The benefits of belonging to a community of practice are numerous. Our experience in the pinhole camera project, we shared our interest in art and photography, as well as learned about ourselves as individuals and members of a community.
Conclusion
Each pinhole camera produced an acceptable image on the first attempt. Our successful tests demonstrated that basic instructions and material are all that are required to create an interesting result.
Our group dynamic was also stimulating as we were able to maintain a positive consensus throughout the project. When conflicts did arise, the group members were confident to express opinions and concerns. Aesthetically, the identity of each person was successfully expressed through the cameras. The unique and personal qualities of each pinhole added to composition and reading of the final sculpture.
References
Bignell, B. J. (n.d.). The pinhole gallery. www.pinhole.org.
Congdon, K. G., Stewart, M., & White, J. H. (2001). Mapping identity for curriculum work. In Y. Gaudelius, & P. Spears (Eds.), Contemporary issues in art education, p. 108-118. Upper Saddle River, N.J: Prentice Hall.
Lowe, S. S. (2001). The art of community transformation. Education and Urban Society, 33 (4), p. 457-471.
Wenger, E. (2006). Communities of practice: A brief introduction. www.ewenger.com.
Copyright © 2025 InArte Journal. All rights reserved